
To create a t-shirt design, define your concept, build the artwork using design software, choose the right colors and placement, and export the file in a print-ready format. The process covers 12 steps, from initial research and sketching through to selecting a printing method, previewing the mockup, and exporting the final file.
Creating a t-shirt design involves researching ideas, selecting the right garment, developing artwork, and preparing the design for professional printing. Start by defining the shirt’s purpose and gathering inspiration, then sketch concepts, build the artwork, choose high-contrast colors, and position the design appropriately on the garment. Technical preparation is equally important, including setting dimensions, maintaining print-ready resolution, and selecting the most suitable printing method.
A successful t-shirt design depends on core elements such as typography, color palette, graphics, composition, whitespace, and layout. Choosing the right tools, avoiding common mistakes, and following print-ready requirements improve design quality, printing accuracy, and overall wearability. Previewing artwork with mockups before production ensures the final design looks effective both on screen and when worn.
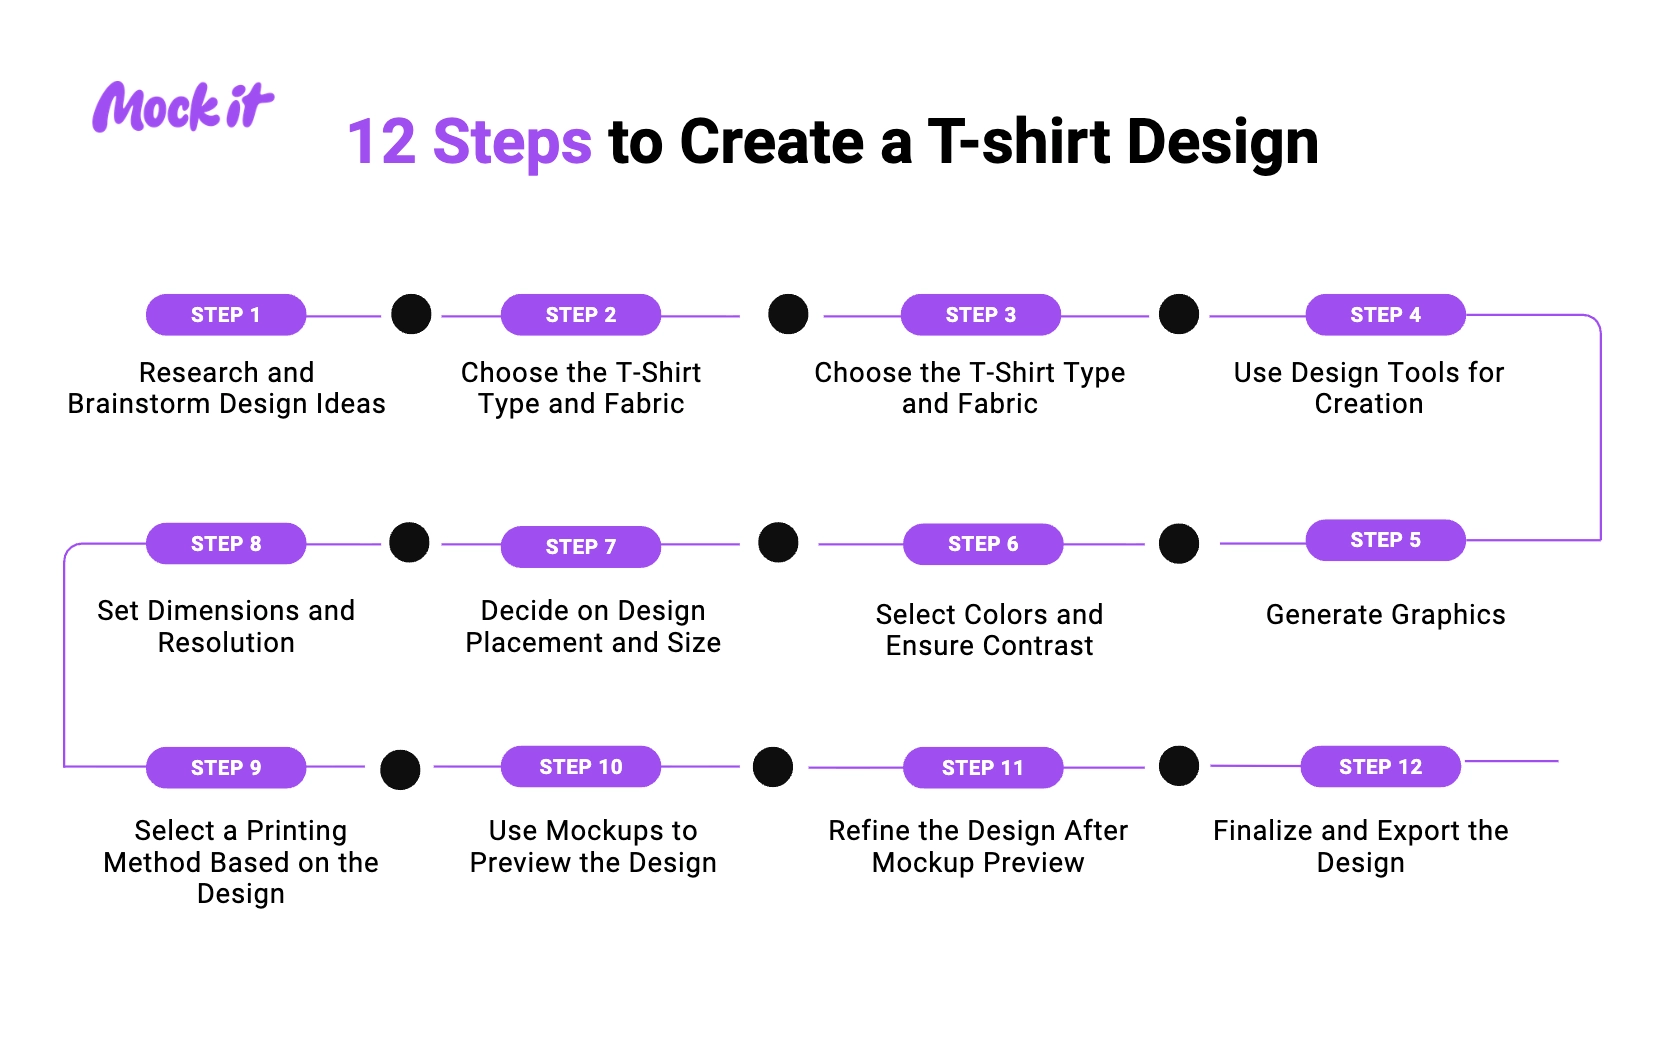
Below are the 12 steps to create a t-shirt design:
- Step 1: Research and Brainstorm Design Ideas: Define the purpose, target audience, and message of your t-shirt, then gather inspiration that supports the intended concept.
- Step 2: Choose the T-Shirt Type and Fabric: Select the garment style, fabric, and shirt color that will best support your t-shirt and printing requirements.
- Step 3: Conceptualize and Sketch the Design: Create rough sketches to plan the layout, graphics, and typography of your t-shirt design before moving to digital creation.
- Step 4: Use Design Tools for Creation: Build your t-shirt design using software that matches your skill level and the project’s complexity.
- Step 5: Generate Graphics: Create graphics, illustrations, logos, or other visual elements that strengthen the message of your t-shirt design.
- Step 6: Select Colors and Ensure Contrast: Choose colors that improve the visibility, readability, and visual impact of your t-shirt style on the chosen garment.
- Step 7: Decide on Design Placement and Size: Position and scale the design so it looks balanced and attractive when worn.
- Step 8: Set Dimensions and Resolution: Prepare your t-shirt with the correct dimensions, resolution, and file settings for high-quality printing.
- Step 9: Select a Printing Method Based on the Design: Choose a printing method that best matches the artwork, garment material, and production requirements of your t-shirt style.
- Step 10: Use Mockups to Preview the Design: Preview the t-shirt design on realistic garment mockups to evaluate its appearance before printing.
- Step 11: Refine the Design After Mockup Preview: Improve the t-shirt design by adjusting spacing, typography, colors, placement, and overall composition.
- Step 12: Finalize and Export the Design: Review the artwork and export it in the correct file format for professional t-shirt printing.
Step 1: Research and brainstorm design ideas
Start by defining the purpose of the custom t-shirt design, the target audience, and the message you want to communicate. Browse graphic tees, custom apparel stores, social media platforms, design galleries, and competitor designs to collect inspiration. Save examples of typography, illustrations, slogans, colors, and layouts that match your concept. Creating a mood board can help organize ideas and identify common visual themes.
Next, generate multiple t-shirt design ideas before selecting one concept. Experiment with different messages, graphic styles, and visual approaches rather than relying on the first idea that comes to mind. Exploring several possibilities helps uncover stronger concepts and reduces the risk of creating a generic design. A clear creative direction makes the rest of the t-shirt design process more focused and efficient.
Step 2: Choose T-shirt type and fabric
Select the shirt style and fabric before creating detailed artwork because the garment influences how the design will look when printed. Decide whether the design is intended for a standard crew neck, an oversized fit, long sleeves, an athletic shirt, or a fashion-focused garment. Also, choose a fabric color that complements the planned graphics and typography instead of competing with them.
Pay attention to fabric composition because different materials support different printing methods. Cotton is commonly used for screen printing and direct-to-garment printing, while polyester is often preferred for sublimation printing. Matching the design to the garment early helps determine suitable colors, print sizes, and production methods. This approach creates a more cohesive final product and improves overall print quality.
Step 3: Conceptualize and sketch the design
Put your ideas on paper by creating rough sketches of the layout, typography, graphics, and overall composition. Focus on arranging elements rather than creating polished artwork. Test different visual directions, experiment with text placement, and explore how graphics and messaging work together. Quick sketches allow you to evaluate concepts before spending time on detailed design work.
Create several variations and compare them side by side to identify the strongest option. Small thumbnail sketches are often enough to reveal balance issues, spacing problems, or weak visual hierarchy. Reviewing multiple concepts helps refine the design and ensures the final direction supports the intended message. A well-planned sketch acts as a blueprint for the digital design stage.
Step 4: Use design tools for creation
Transfer your chosen concept into digital software or an online t-shirt design platform and begin building the final artwork. Use beginner-friendly design tools such as Canva, Kittl, or Placeit for simple projects, or professional software like Adobe Illustrator and Photoshop for more advanced graphic design work. Organize artwork with layers, use alignment tools, and maintain consistent spacing throughout the design.
Take advantage of design features that improve accuracy and efficiency. Grids, guides, typography controls, and shape tools help create cleaner layouts and more balanced compositions. Working digitally also makes it easier to test colors, resize elements, and revise graphics without starting over. Using the right design tools allows you to develop a professional-looking graphic t-shirt that is easier to prepare for printing.
Step 5: Generate Graphics
Create graphics that support the shirt’s main message and remain easy to recognize from a distance. Use illustrations, icons, logos, typography treatments, or AI-generated concepts as the visual centerpiece of the design. Keep artwork clean and purposeful so it remains effective when printed on fabric and viewed in real-world conditions.
Choose the correct graphic format based on how the design will be used. Raster graphics are made of pixels and can lose quality when enlarged, while vector graphics use mathematical paths that scale without losing sharpness. For logos, text-based artwork, and detailed illustrations, use vector graphics whenever possible, as they offer greater scalability across multiple shirt sizes. Selecting the appropriate format helps preserve print quality and production flexibility.
Step 6: Select colors and ensure contrast
Choose colors that make the design stand out clearly against the shirt fabric. Compare different color combinations and test them on both light and dark garments to ensure strong visibility. Text, illustrations, and graphic elements should remain easy to identify from a distance. High contrast between the artwork and the garment typically improves readability and overall visual impact.
Switch to CMYK color mode before finalizing artwork intended for printing. Commercial printers reproduce colors using cyan, magenta, yellow, and black inks, so designing in CMYK helps improve printing accuracy. Reviewing colors early reduces the chances of unexpected shifts during production. Well-selected colors not only strengthen the design visually but also contribute to more consistent shirt printing results.
Step 7: Decide design placement and size
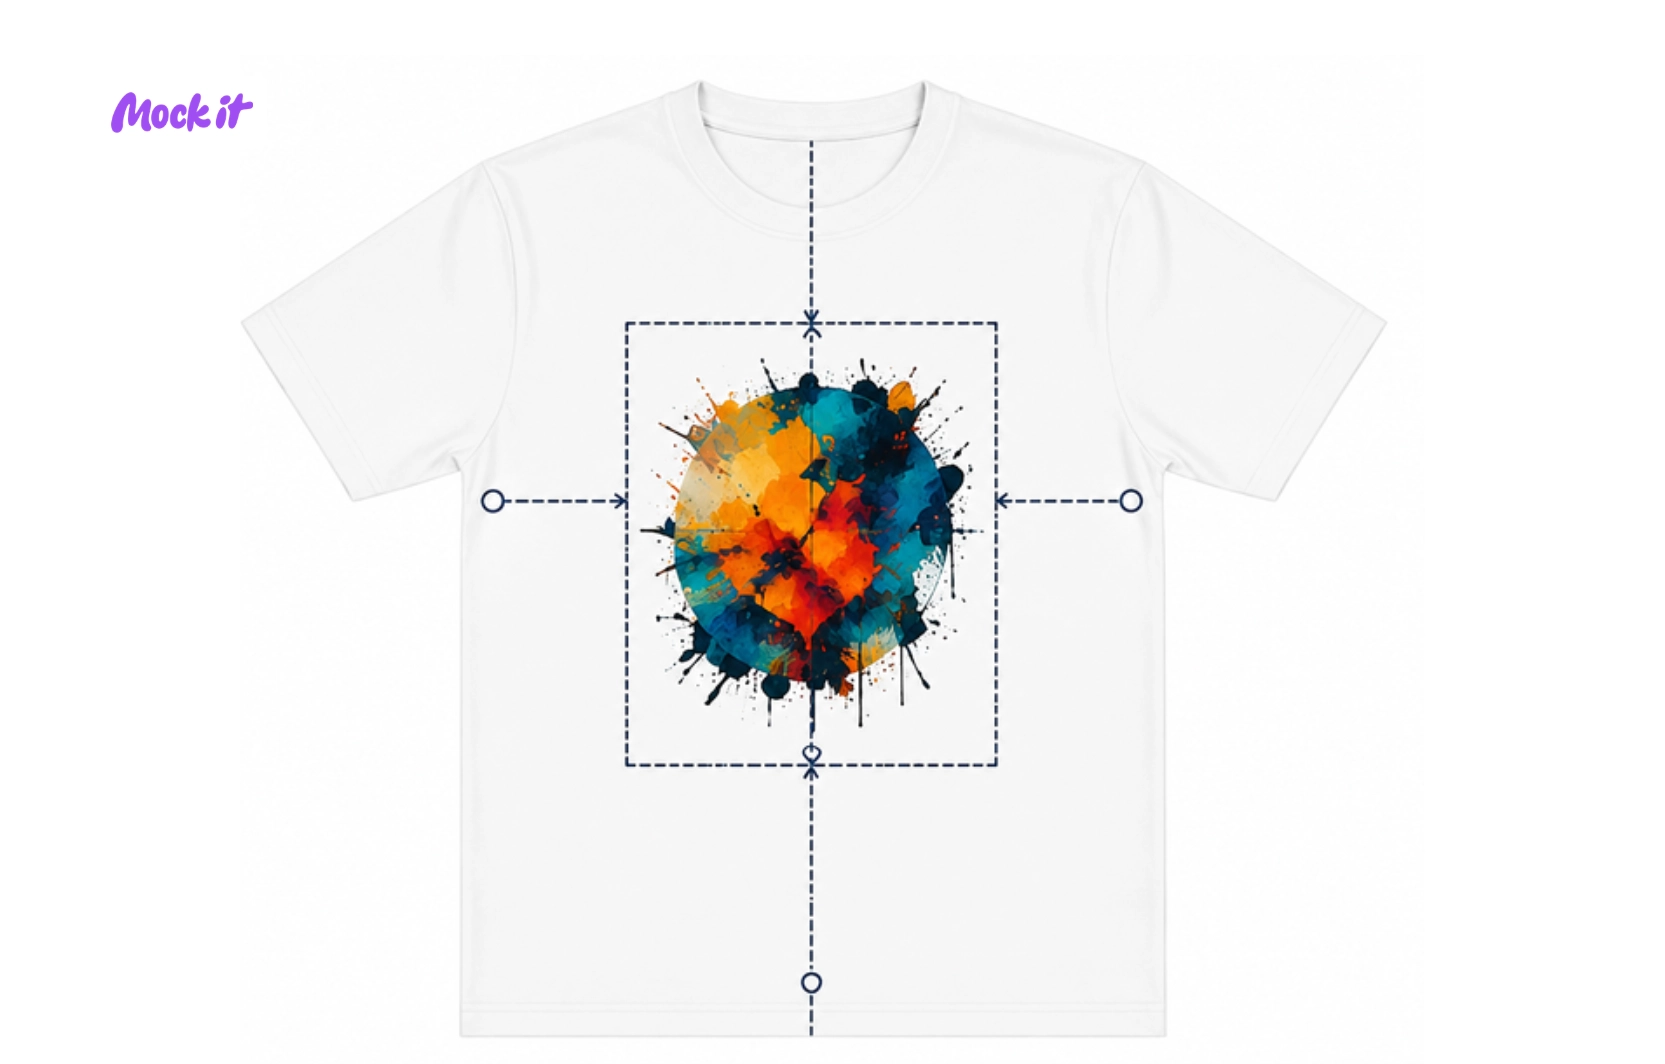
Position the artwork so it has the greatest visual impact when the shirt is worn. Common locations include the center chest, left chest, upper back, full front, and sleeves. Select a placement that supports the design’s purpose and suits the garment’s style. Viewing the layout on a shirt template can help determine whether the position feels balanced and natural.
Adjust the artwork’s scale based on both the garment size and the design complexity. Oversized graphics can dominate the shirt, while very small designs may go unnoticed. Compare several placement and sizing options before making a final decision. Proper positioning helps create a balanced appearance and ensures the design remains visible, readable, and proportionate across different shirt sizes.
Step 8: Set dimensions and resolution
Set up the artwork using dimensions that match the intended print area and production requirements. Establish the canvas size before exporting files so graphics maintain their intended proportions. Following printer guidelines early helps prevent resizing issues and reduces the risk of production errors.
Maintain a resolution of approximately 300 DPI for print-ready raster artwork to achieve sharp and detailed results. Low-resolution files often produce blurry or pixelated prints when enlarged. Review dimensions, image quality, and transparency settings before moving to production. Properly prepared artwork improves print clarity and ensures the final design looks professional on the finished garment.
Step 9: Select printing method based on design
Match the design to a printing method that supports its level of detail, color count, and intended production volume. For smaller runs or individual orders, print-on-demand services offer a flexible alternative to traditional bulk printing. Screen printing is commonly used for bold graphics and large orders, while direct-to-garment printing is often suitable for detailed full-color artwork. Evaluate the design requirements before choosing a production technique.
Consider both the garment material and the artwork itself. Sublimation is typically used on polyester garments, while heat transfer vinyl works well for simple lettering and logos. Selecting the appropriate printing method helps preserve design quality, improve durability, and reduce production challenges. The right choice ensures the final shirt accurately reflects the original design.
Step 10: Use mockups to preview the design
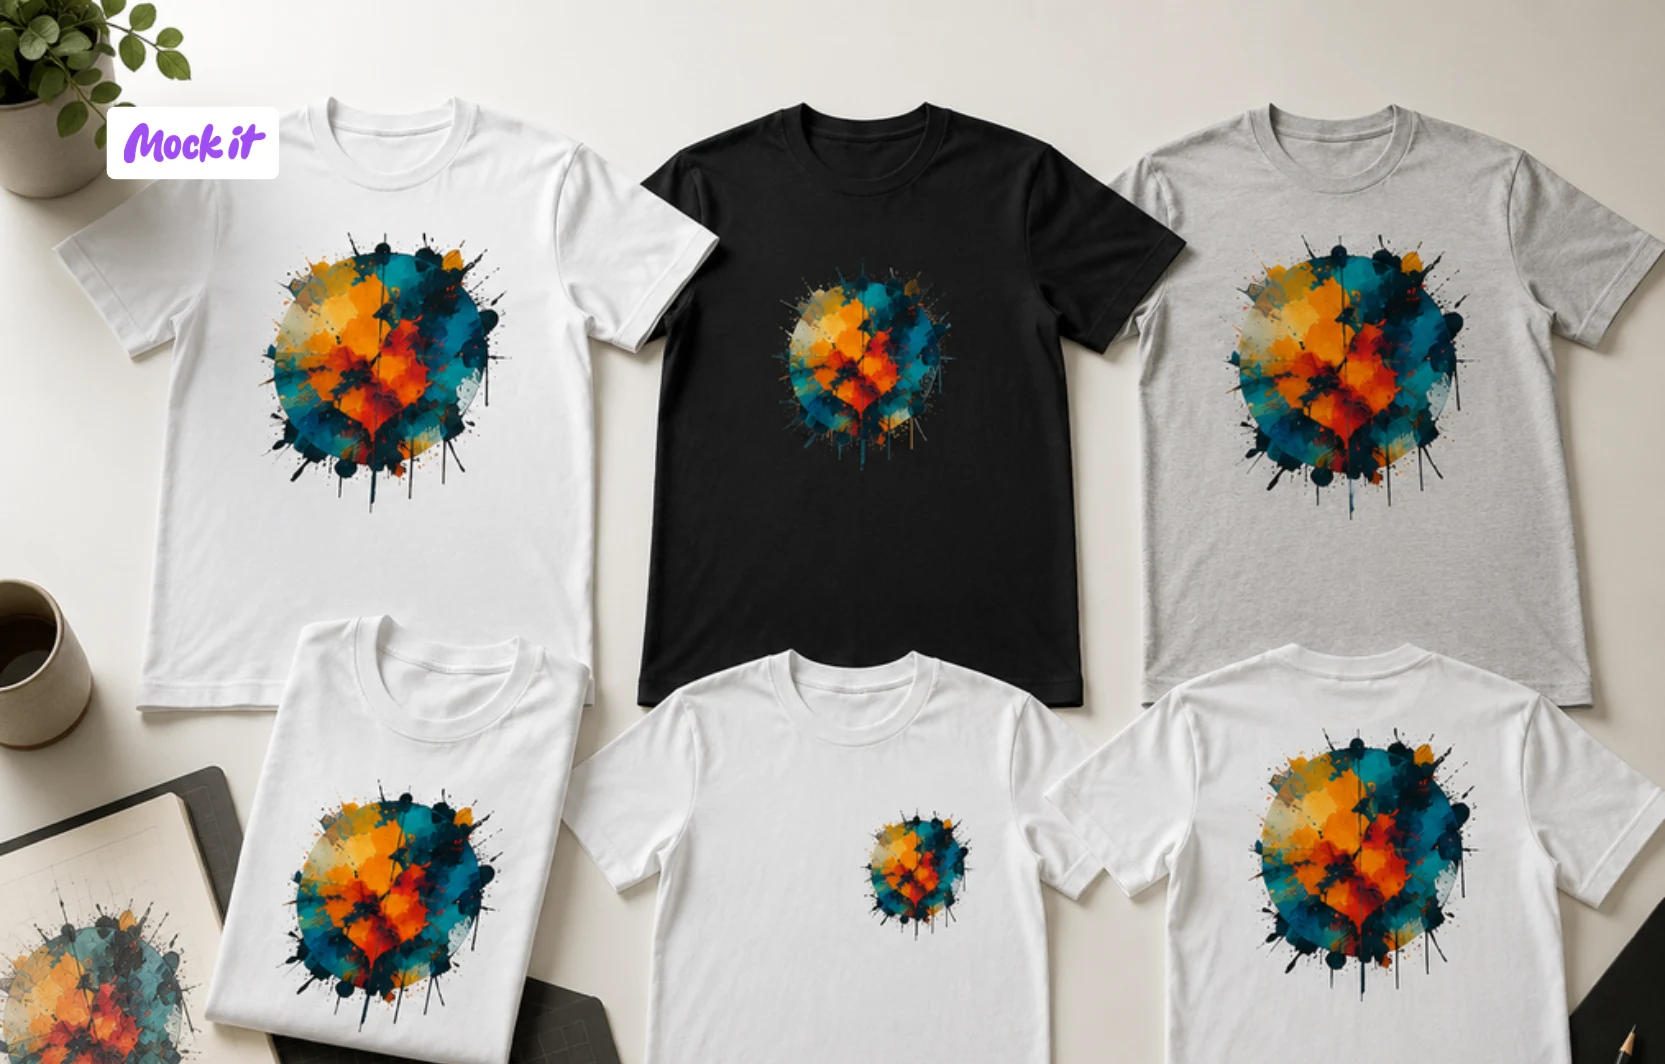
Place the artwork on a realistic shirt template before approving it for production. Viewing the design on an actual garment mockup reveals how the size, placement, and proportions will appear when worn. This step makes it easier to identify issues that may not be visible on a flat design canvas.
Review the design from multiple perspectives and compare different garment colors, styles, and placements. Before finalizing production files, use a t-shirt mockup to evaluate visual balance and presentation quality. Mockups also help communicate design concepts to customers, clients, or team members. Testing the artwork in a realistic setting reduces uncertainty and supports more informed design decisions.
Step 11: Refine the design after mockup preview
Make adjustments based on what you observe in the mockup rather than assuming the first version is finished. Examine spacing, typography, color contrast, alignment, and graphic scale to identify areas for improvement. Even strong designs often benefit from minor refinements once they are viewed on a realistic garment.
Focus on improving clarity and overall visual balance rather than adding unnecessary elements. Small modifications can make text easier to read, strengthen the composition, and create a cleaner appearance. Revising the artwork after mockup testing helps eliminate avoidable issues before production and increases confidence in the final design.
Step 12: Finalize and export the design
Review every aspect of the artwork before creating production files. Confirm dimensions, transparency settings, color mode, resolution, and graphic placement. Remove unused elements, organize layers if necessary, and verify that all revisions have been applied correctly. A final quality check helps prevent mistakes from reaching production.
Export the design using the file format recommended by the printer or print-on-demand provider. PNG files are commonly used for transparent graphics, while AI, EPS, SVG, and PDF formats are often preferred for professional production workflows. Saving the correct file version ensures the design remains print-ready and preserves quality throughout the manufacturing process.
What Are the Core Elements of T-Shirt Design?
Typography, color contrast, graphics, composition, whitespace, and placement are the core elements of t-shirt design because they determine readability, visual impact, balance, and print quality. A successful design combines clear text, visible colors, clean artwork, organized layouts, sufficient spacing, and strategic positioning on the garment. When these elements work together, the design becomes easier to understand, more appealing to wear, and better suited for professional shirt printing.
The 6 core elements of a successful t-shirt design are:
- Typography and font selection
- Color palette and contrast
- Graphics and imagery
- Balance and composition
- Whitespace and negative space
- Design placement and layout
Typography and font selection
Choose fonts that remain clear and readable when displayed on a t-shirt. Text should be large enough to read from a distance and styled to support the design without reducing visibility. While decorative lettering can add personality to a graphic t-shirt, overly complex fonts often become difficult to read when printed on fabric. Clear typography helps the t-shirt communicate its message quickly and ensures important text remains visible across different shirt sizes.
Color palette and contrast
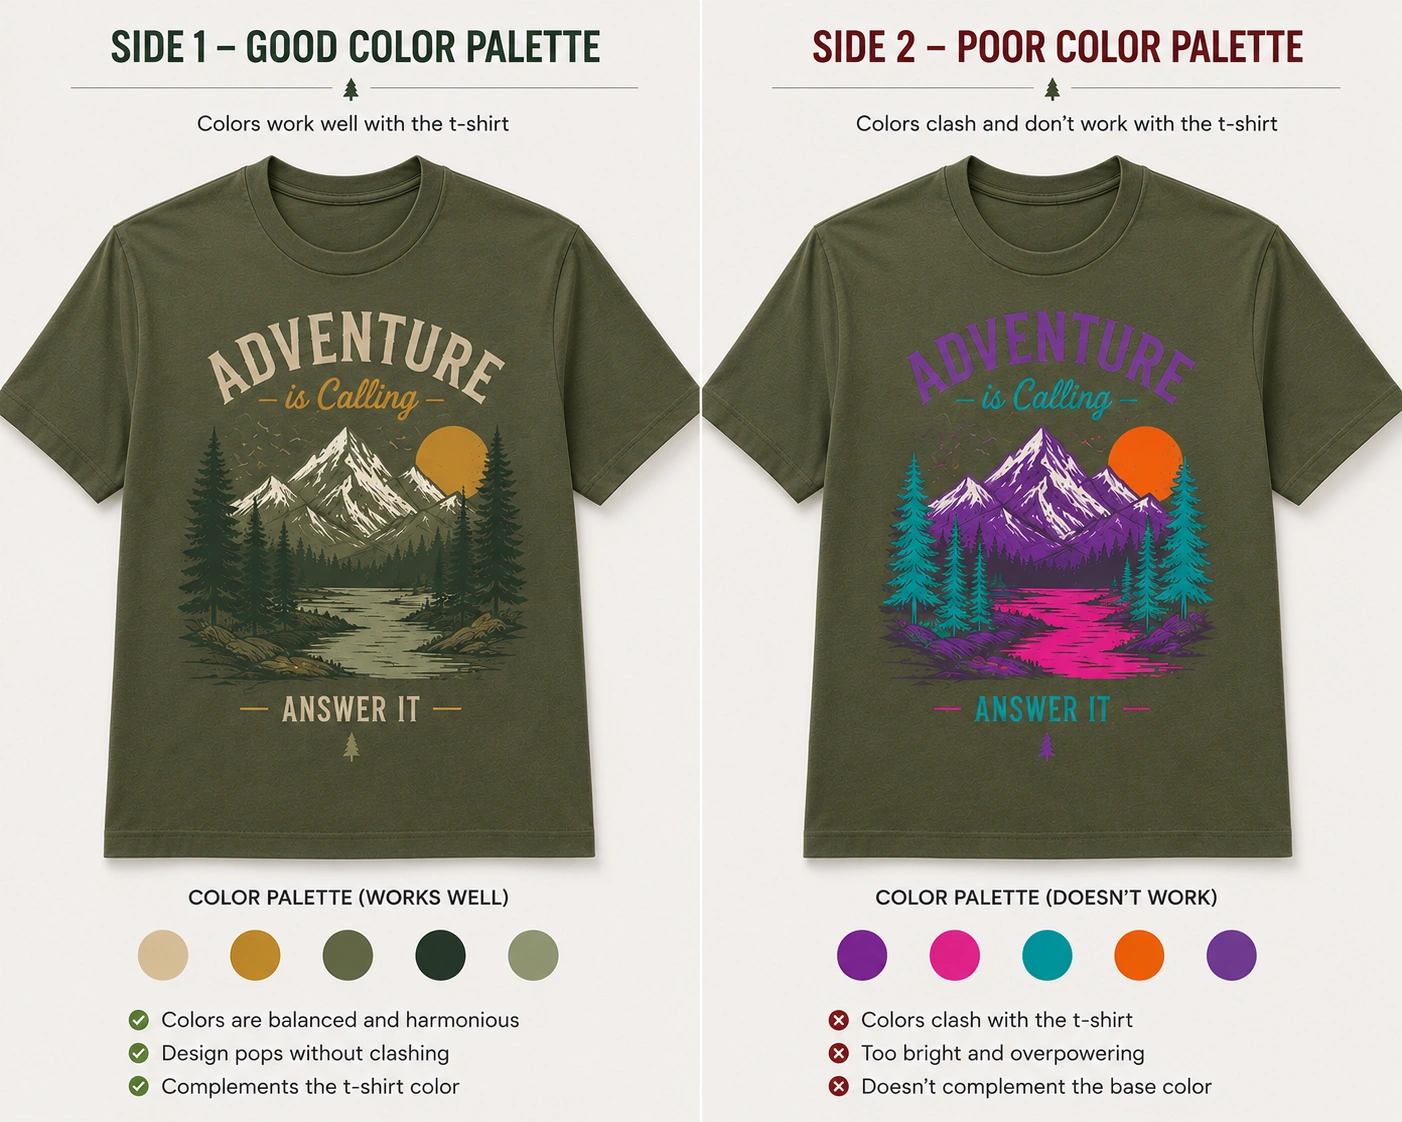
Select colors that create a strong contrast between the t-shirt fabric and the printed design. A graphic printed on a similar-colored garment can lose visibility and reduce overall impact. High contrast helps text, illustrations, and logos stand out more clearly while improving print clarity. Well-chosen color combinations also make a t-shirt design easier to recognize in different lighting conditions and ensure the artwork remains visually effective when worn.
Graphics and imagery
Use simple, high-quality graphics that reproduce cleanly on a t-shirt. Whether the design features illustrations, icons, logos, or custom artwork, every visual element should contribute to the overall message. Overly detailed graphics can become difficult to print and may lose clarity on fabric. Clean imagery helps a graphic t-shirt remain recognizable from a distance and improves both visual appeal and print quality.
Balance and composition
Arrange the elements of the t-shirt design so they feel visually balanced across the available print area. When graphics, text, or decorative elements are concentrated in one section, the design can appear cluttered or uneven. A balanced composition creates a smoother visual flow and makes the artwork easier to understand. Proper arrangement also helps the t-shirt look more professional when viewed on the body rather than on a flat design canvas.
Whitespace and negative space
Leave sufficient space between elements to improve the clarity of the t-shirt design. Crowding text, graphics, and decorative details together can make the artwork harder to read and less visually appealing. Negative space helps separate key design components and draws attention to the most important elements. On a printed t-shirt, proper spacing often creates a cleaner appearance and prevents the design from feeling overwhelming.
Design placement and layout
Position the t-shirt design where it looks natural when the garment is worn, such as the center chest, left chest, upper back, or sleeve. Placement should reflect both the design’s purpose and the artwork’s size. A well-positioned graphic creates better visual balance and improves visibility. Choosing the right layout helps the t-shirt design feel intentional and ensures that the artwork complements the garment’s shape and fit.
What Design Tools and Software To Use for Creating a T-shirt Design?
The best design tools and software for creating a t-shirt design include beginner-friendly platforms, professional design software, AI-powered tools, and ready-made design platforms. The right choice depends on your experience level, design complexity, budget, and workflow requirements. Free beginner platforms cover most basic projects, while professional software typically requires a paid subscription. Beginners can create simple layouts quickly, professionals can build print-ready artwork with advanced controls, AI tools can accelerate graphic creation, and template-based platforms can simplify previews, mockups, and production preparation.
The 4 categories of tools used for creating a t-shirt design are:
- Beginner-friendly design platforms
Use platforms such as Canva, Kittl, or Placeit when creating simple t-shirt designs without advanced design experience. Canva offers drag-and-drop editing with ready-made templates, Kittl specializes in vintage and typographic design styles, and Placeit provides built-in mockup generation alongside its design editor. These tools are best suited for basic custom apparel projects, text-based designs, and fast design turnaround. - Professional design tools
Choose Adobe Illustrator or Photoshop when creating detailed t-shirt artwork that requires advanced editing, custom illustrations, typography control, or print-ready production files. Illustrator is particularly useful for vector graphics and scalable designs, while Photoshop is often used for photo-based artwork and detailed graphic editing. Procreate is also widely used for hand-drawn illustrations and custom artwork, particularly for independent designers working on tablets. - AI-powered design tools
Use AI tools such as Midjourney, Adobe Firefly, or Leonardo AI when you need to generate graphics, explore creative concepts, create design variations, or speed up the brainstorming process. AI can help produce illustrations, slogans, icons, and visual directions within minutes. For best results, refine AI-generated outputs using design software before preparing them for shirt printing. - Ready-made design platforms
Choose ready-made platforms such as Printful, Printify, or Redbubble when you need templates, quick design customization, or fast production previews. These print-on-demand tools allow users to test layouts, compare shirt styles, and generate a realistic t-shirt mockup before ordering or publishing the design. They are useful for validating ideas and reviewing the final appearance with minimal effort.
What Are the Common T-Shirt Design Mistakes to Avoid?
Avoid overcomplicated layouts, low-resolution artwork, poor color contrast, incorrect placement, illegible typography, weak wearability, unedited AI-generated graphics, copyright violations, proofreading mistakes, and incorrect file preparation, as these are the most common t-shirt design mistakes. These issues can reduce visual clarity, weaken the intended message, and lead to printing problems that affect the final look of the t-shirt. Keeping designs simple, well-balanced, and properly prepared ensures better print quality, stronger visual impact, and a more professional and wearable result.
Below are the 10 common t-shirt design mistakes to avoid:
- Overcomplicating the design
Adding too many elements to a t-shirt design can make the message difficult to understand and reduce its visual impact. Excessive graphics, fonts, colors, and effects often compete for attention instead of supporting a clear focal point. Viewers should be able to recognize the main idea quickly. Simplifying the layout helps improve readability, strengthens communication, and creates a more memorable t-shirt design that works effectively both up close and from a distance. - Using low-resolution artwork
Using low-resolution artwork in a t-shirt design can result in blurry, pixelated, or unprofessional-looking prints. Graphics created with insufficient image quality often lose detail when enlarged to fit a garment. Most shirt printing providers recommend approximately 300 DPI for raster artwork to maintain sharpness. Checking resolution before production helps preserve graphic quality and ensures the printed t-shirt looks clean, detailed, and suitable for commercial use. - Choosing a poor color contrast
Poor color contrast can cause a t-shirt design to blend into the fabric, making important graphics and text difficult to see. When artwork lacks sufficient separation from the garment color, visibility and readability suffer. Strong contrast helps viewers recognize the design quickly and improves print clarity. Testing artwork against the intended shirt color helps ensure the t-shirt design remains noticeable and visually effective in different environments. - Incorrect placement and sizing
Incorrect placement or sizing can make a t-shirt design appear awkward, unbalanced, or difficult to notice when worn. Artwork that is too small may lose impact, while oversized graphics can overwhelm the garment. Poor positioning can also affect how the design interacts with the body and clothing fit. Reviewing scale and placement before production helps create a balanced t-shirt design that looks natural on the finished garment. - Using illegible typography
Fonts that are overly decorative, tightly spaced, or too small in a t-shirt design can become difficult to read from a distance. Using illegible typography can prevent people from quickly understanding the message, especially since t-shirts are often viewed while walking or in motion. Choosing clear, well-spaced, and appropriately sized fonts improves readability, strengthens visual impact, and ensures the design communicates effectively when printed on fabric. - Ignoring design context and wearability
A design that looks attractive on a screen may not always look effective on a person when printed on a t-shirt. Factors such as garment fit, body movement, print area, and viewing distance can influence how the artwork appears when worn. Ignoring these considerations may result in a t-shirt design that feels awkward or unbalanced. Evaluating the design in realistic usage scenarios helps improve both appearance and wearability. - Using unrefined AI-generated graphics
AI tools can generate concepts quickly, but raw outputs often contain inconsistencies, cluttered details, distorted elements, or visual inaccuracies that may not translate well into t-shirt printing. Publishing AI-generated artwork without refinement can reduce the professionalism of a t-shirt design. Review, edit, and simplify generated graphics before production to improve clarity and consistency. Combining AI-generated concepts with manual design adjustments typically produces stronger and more reliable results. - Using copyrighted materials
Using copyrighted content in a t-shirt design without permission can create legal, financial, and production-related problems. Logos, illustrations, photographs, characters, and branded assets are often protected by intellectual property laws. Unauthorized use may result in rejected orders, takedown requests, or legal disputes. Verifying usage rights before incorporating third-party content helps ensure the t-shirt design can be produced and sold without complications. - Failing to proofread the design
Not proofreading a t-shirt design can lead to spelling mistakes, alignment issues, incorrect information, and avoidable production errors. Small errors often become more noticeable once the design is printed on a garment, affecting its overall quality and professionalism. Fixing these mistakes after production can be costly and time-consuming. Carefully reviewing all text and graphics before exporting ensures the final t-shirt design is accurate, polished, and print-ready. - Using incorrect file formats or missing transparency
Incorrect file formats or missing transparency are common mistakes in preparing t-shirt design files. Wrong formats can cause compatibility issues with printing systems, while missing transparency may leave unwanted background boxes around graphics. This affects the overall look and professionalism of the t-shirt design. To avoid problems, always follow print-ready requirements, including correct file type, high resolution, proper color mode, and preserved transparency. Checking these settings before submission helps ensure the design prints cleanly and accurately on the final t-shirt.
Frequently Asked Questions About T-Shirt Design
Can I create a t-shirt design for free?
Yes, platforms such as Canva and Kittl offer free plans that include design templates, fonts, and basic graphics suitable for custom t-shirt design. Free print-on-demand platforms like Printful and Printify also allow users to create and sell t-shirt designs without upfront costs, taking a percentage of each sale instead. Once the design is ready, tools like Mock It let you preview it on realistic high-resolution t-shirt mockups before printing, with a free 7-day trial and access to over 5,000 apparel templates across major clothing brands.
What is the best file format for t-shirt printing?
PNG is the most commonly accepted file format for t-shirt printing because it supports transparent backgrounds and maintains graphic quality. For professional production workflows, AI, EPS, SVG, and PDF formats are often preferred. Always confirm the required format with your printer or print-on-demand provider before exporting.
What resolution should a t-shirt design be?
Print-ready t-shirt designs should be set to approximately 300 DPI to ensure sharp, detailed results. Low-resolution files often produce blurry or pixelated prints when enlarged to fit a garment. Always check resolution settings before submitting files for production.
How do I create a custom t-shirt design online?
Use an online design platform such as Canva, Kittl, or Placeit to create a custom t-shirt design directly in your browser. Choose a template or start from scratch, add graphics and typography, adjust colors, and preview the design on a mockup before downloading or submitting it for printing.
What is print-on-demand, and how does it work for t-shirt design?
Print-on-demand is a production model in which t-shirts are printed individually as orders are placed, eliminating the need for bulk inventory. Platforms like Printful, Printify, and Redbubble handle printing, packaging, and shipping on behalf of the designer. Creators upload their t-shirt designs, set a selling price, and earn a margin on each sale without managing stock.

 Trusted By Thousands Of Designers
  Cancel Your Subscription Anytime
  30 Day Money Back Guarantee