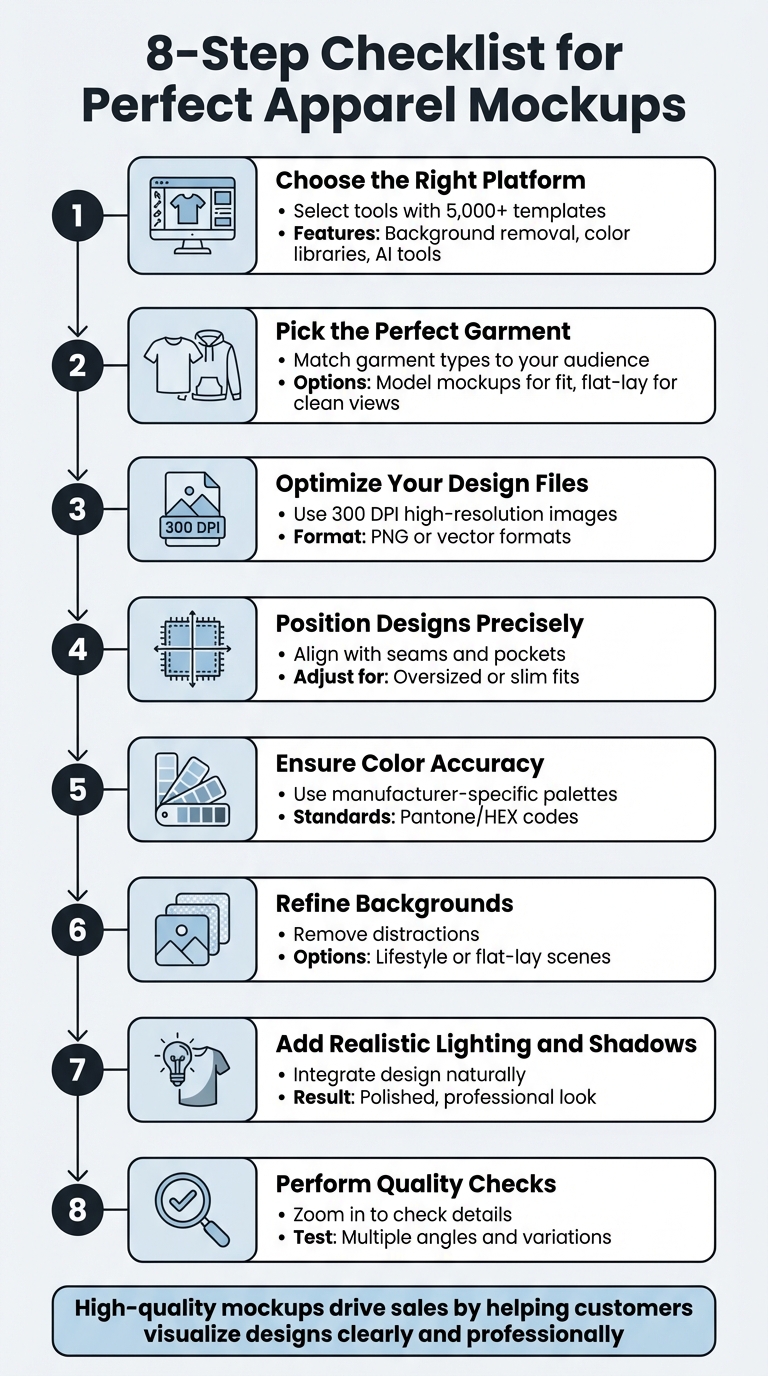
Your apparel mockups are a critical part of showcasing your designs and convincing customers to buy. Poor visuals can drive people away, while polished mockups help your brand stand out. Here’s how to create professional-looking mockups step-by-step:
- Choose the right platform: Tools like Mock It offer over 5,000 templates and advanced features like background removal, color libraries, and AI tools.
- Pick the perfect garment: Match garment types (e.g., t-shirts, hoodies) to your audience. Use model mockups for fit visuals or flat-lay for clean product views.
- Optimize your design files: Use high-resolution images (300 DPI) in PNG or vector formats to ensure clarity.
- Position designs precisely: Align artwork with garment features like seams and pockets. Adjust placement for different garment fits, like oversized or slim styles.
- Ensure color accuracy: Use manufacturer-specific color palettes or Pantone/HEX codes to match real garment colors.
- Refine backgrounds: Remove distractions or choose lifestyle or flat-lay scenes that suit your brand.
- Add realistic lighting and shadows: This integrates your design naturally with the garment for a polished look.
- Perform quality checks: Zoom in to ensure details like seams, folds, and textures look natural. Test multiple angles and create variations for your product range.
Mock It is a standout platform for apparel mockups, offering tools to save time and improve design accuracy. It’s priced at $19.99/month or $14.99/month annually, with a 7-day free trial.
Key takeaway: High-quality mockups drive sales by helping customers visualize your designs clearly and professionally.
8-Step Checklist for Creating Professional Apparel Mockups
Preparation Steps
Select Your Mockup Platform
The platform you choose for creating mockups can make or break your workflow. Mock It is a standout option, offering over 5,000 clothing mockup templates across 45+ apparel brands. This extensive, brand-specific library sets it apart from competitors. While Placeit is ideal for beginners with its straightforward templates, and Smartmockups shines with integrations like Canva, Mock It goes a step further. It includes advanced tools such as a background remover, scene creator, detailed color libraries, and even an AI text-to-image generator to streamline your process. Mock It’s variety ensures your designs accurately reflect fit and texture. Plus, users who commit to the yearly plan save 25% compared to monthly billing, and there’s a 7-day free trial to explore its features fully. Once you’ve picked your platform, you’re ready to choose a garment that aligns with your brand’s style.
Choose Your Garment Type
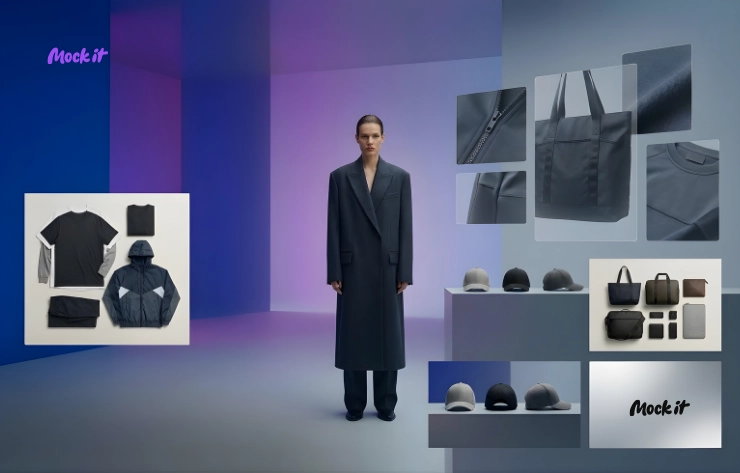
With Mock It’s ultimate mockup collection at your fingertips, selecting the right garment type becomes easier. Tailor your choice to your target audience to leave a lasting impression. For example, a high-end streetwear label aimed at young adults might require different mockups than a sustainable fashion line or a collection for kids. Mock It covers a range of options, including t-shirts, hoodies, sweatshirts, and youth wear. Cotton blends highlight softness and natural drape, while heavyweight blanks signal premium quality. Model mockups show how garments fit and move on a person, whereas flat lay or technical mockups provide clean, distraction-free views of your design, giving customers a clear understanding of your product.
Prepare Your Design Files
Once you’ve nailed down your platform and garment type, it’s time to optimize your design files. Always use high-resolution images to maintain the clarity of your artwork. PNG files with transparent backgrounds or vector formats are ideal since they scale without losing quality.
"High-resolution images ensure that every intricate detail of your design is showcased accurately." – Abel B., Contributor, Mock It
Before uploading, finalize every element of your design. Test your color palette against various garment shades to ensure your designs are both visible and convey the right tone. Most platforms, including Mock It, feature simple drag-and-drop interfaces, so keeping your files in standard web-ready formats will make the upload process smooth and hassle-free.
sbb-itb-1e8f9ab
Design Placement and Adjustments
Position Your Design Correctly
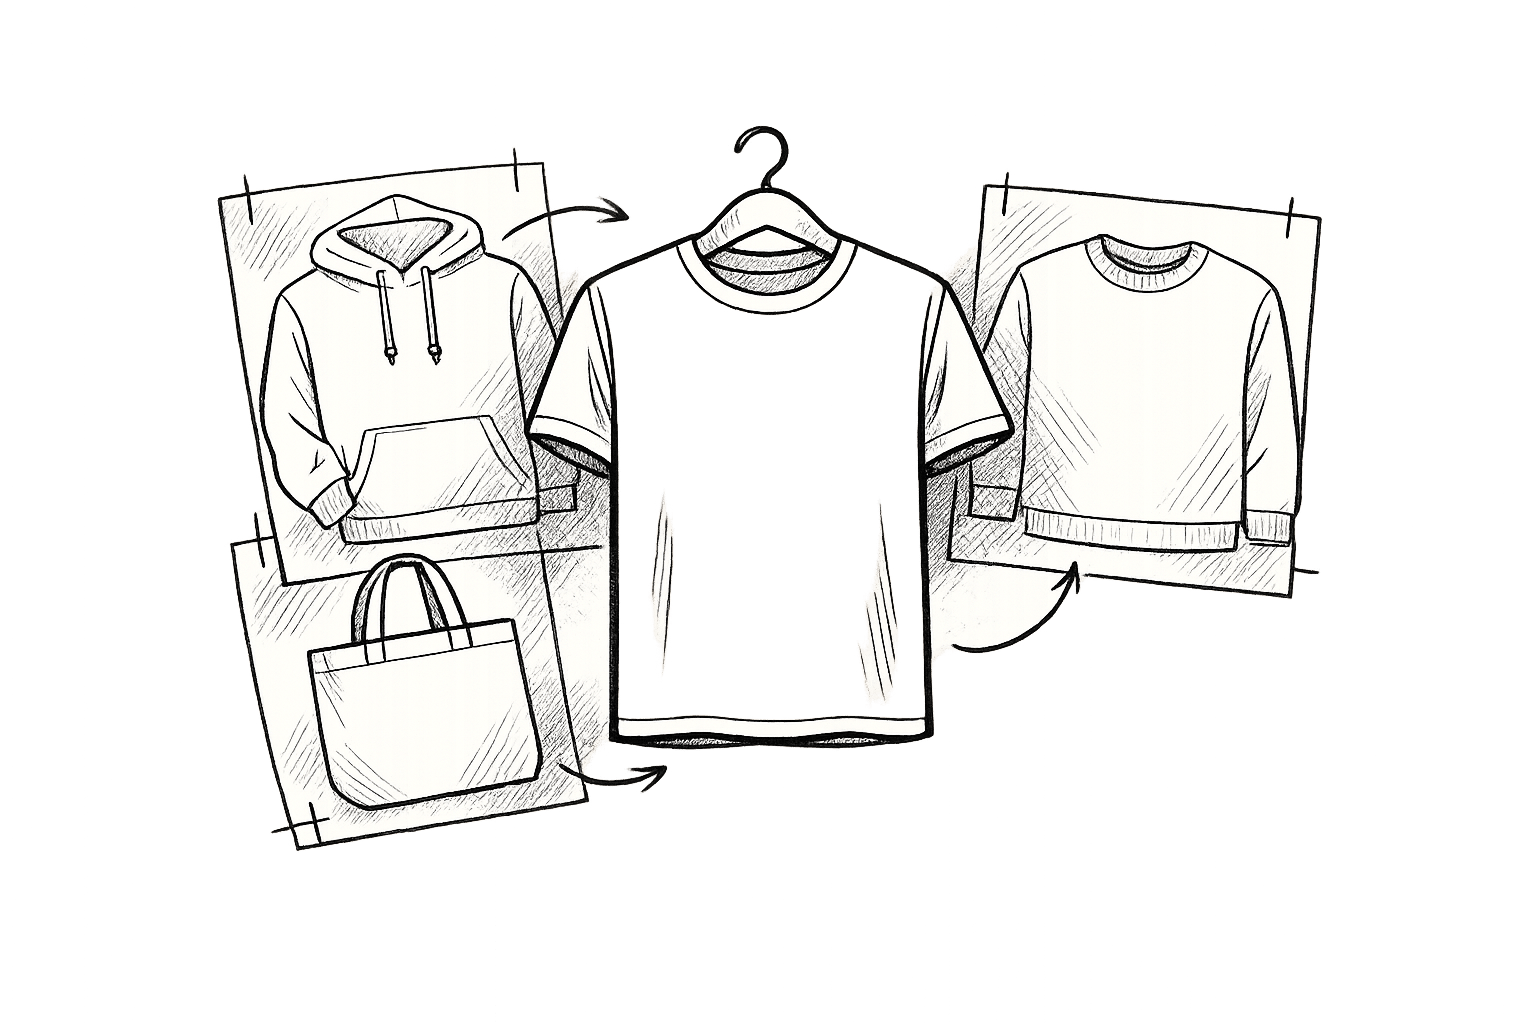
Getting the alignment right is key to creating professional-looking mockups. Make sure your design works seamlessly with garment features like seams, pockets, and other details. To avoid interference, upload a transparent PNG file – this ensures your design integrates smoothly with the garment’s features. Mock It offers a library of over 4,000 garment-specific templates, such as the American Apparel 2406 Fine Jersey Pocket T-Shirt, so you can see exactly how your design interacts with pockets and seams.
For precision, rely on technical mockups. These flat-lay or technical sketches provide an undistorted view of print areas and seam lines. Align your artwork with the natural contours of the fabric to achieve a polished look. Don’t forget to check the front, back, and side views to ensure your design stays consistent across seams and curves.
Scale Your Artwork
To maintain clarity and sharpness, always use designs with a resolution of 300 DPI. For standard adult left-chest logos, aim for a size of 3.5" x 3.5". If you’re working on youth sizes, scale the design down to a width of 2" to 3" to keep the proportions intact.
Consider the garment’s fit when positioning your design. Slim-fit styles may require moving the artwork slightly upward, while oversized garments might need it adjusted downward for better balance on the fabric. For hoodies, lower the center chest placement by 3.5"–5" from the neckline to accommodate the hood. Mock It’s resize tool, located at the bottom right of the selection box, lets you adjust the size proportionally without distorting your artwork.
| Placement Zone | Adult Standard Size | Youth Scaled Size |
|---|---|---|
| Left Chest | 3.5" x 3.5" | 2"–3" wide |
| Center Chest | 6" x 6" to 10" x 12" | 6"–8" wide |
| Full Front | Up to 12" x 16" | Max ~10" wide |
Once your design is scaled appropriately, you’re ready to incorporate custom elements for added flair.
Add Text and Custom Elements
Mock It’s scene creator makes it simple to add text, logos, and custom elements with precision. Using the Plus icon tool, you can drag and drop artwork or upload files directly from your computer, which are then automatically placed onto your mockup. The drag-and-drop editor is intuitive, allowing you to position and adjust custom elements quickly. This streamlined process ensures your visuals maintain a polished and professional standard for customer presentation.
Color Accuracy
Use Color Libraries
Once your artwork is perfectly positioned, the next step is ensuring the colors are spot-on. Getting the colors right is what separates professional mockups from amateur ones. Mock It simplifies this process by offering manufacturer-specific color palettes from popular brands like Bella + Canvas, Gildan, Comfort Colors, and Los Angeles Apparel. This means your digital mockup can precisely match the actual garment colors available for production, saving you from unnecessary guesswork and preventing errors like using colors that don’t even exist for your selected garment.
For even greater precision, Mock It provides access to complete Pantone and HEX color libraries. This is especially useful when working with clients who have strict brand color guidelines.
"Picking the wrong color can totally kill an awesome design. Clashing colors can make the shirt look dull, unappealing and honestly, pretty ugly." – Jeremy P., Founder and CEO, Mock It
Once your colors are aligned, the next step is testing how your design looks on different backgrounds.
Test Design Visibility
After fine-tuning colors with the provided libraries, it’s crucial to check how your design holds up across various garment options. Start by testing on basic black and white garments, then expand to 10 color variations to find the 2–3 options that make the biggest impact.
Leverage color theory to make your designs stand out. For example, pairing garment colors with complementary hues on the color wheel can make your artwork pop. Mock It’s layer management system makes this process seamless by allowing you to switch garment colors instantly without affecting your design.
"Choosing the right color t-shirt to match your design can be the difference between making a sale or someone leaving your shop." – Jeremy P., Founder and CEO, Mock It
Once you’ve finalized the color combinations, the final touch involves refining your mockup with realistic lighting and shadows.
Add Lighting and Shadows
Lighting and shadows are the secret to creating depth and realism in your mockups. Adjust the direction, intensity, and color temperature of your light source to ensure your design integrates naturally with the garment and background. Matching the light source’s color temperature with the overall scene prevents colors from looking faded or washed out.
Shadows are equally important. They should mimic the fabric’s natural folds, making your design look like it’s truly printed on the garment rather than just sitting on top of it. The trick is to strike a balance – shadows should enhance depth without distorting your carefully chosen HEX or Pantone colors.
"Shadows are essential for adding depth and dimension to your mockup. They create a sense of realism by mimicking how light interacts with fabric and surfaces." – Abel B., Contributor, Mock It
Avoid going overboard with filters or heavy effects, as they can make your mockups look artificial. Start by testing your lighting setup on basic colors, then move to more complex combinations. Don’t forget to evaluate how different backgrounds influence the overall look.
How To Make PROFESSIONAL T-Shirt Mockups For Your Clothing Brand Or Print Shop
Background and Scene Setup
The background of your mockup plays a key role in helping customers imagine your apparel in a real-world setting. It sets the stage for your design and can make or break the appeal of your product. Let’s dive into how you can refine and manage your mockup backgrounds effectively.
Remove or Replace Backgrounds
With tools like Mock It’s background remover, you can create clean, transparent visuals that keep the focus on your product. Available exclusively to Pro users, this feature helps you eliminate distracting elements and seamlessly place your mockup into any scene – whether it’s a lifestyle shot or a flat lay. Start with neutral backgrounds to highlight your design, then branch out into more creative options to enhance your presentation.
Choose Lifestyle or Flat Lay Scenes
Once your background is polished, choose the type of scene that best fits your purpose for apparel validation. Lifestyle mockups showcase garments in real-world scenarios, helping customers picture themselves wearing your designs. These are ideal for social media promotions and product launches. On the flip side, flat lays offer a clean and professional look, perfect for eCommerce sites where precision in color and detail is essential.
"In today’s competitive fashion industry, customers crave immersive and authentic experiences that allow them to visualize how a garment would look and feel in real life."
– Abel B., Contributor, Mock It
Select scenes that align with your target audience and brand. For example, urban settings might resonate with streetwear fans, while clean, active backdrops suit athleisure collections. If you’re marketing to males aged 18–34, tailor your scenes to reflect their lifestyle and interests.
Keep Visual Consistency
Consistency in your visuals strengthens your brand identity and ensures your mockups look polished and professional. Tools like Mock It’s Brand Kit allow you to apply your logo and color palette across all mockups instantly. This creates a unified look for your entire catalog.
Pay attention to details like lighting direction, intensity, and color temperature to maintain harmony across your scenes. Use the same industry-standard blanks, such as Gildan 5000 or Bella+Canvas, to ensure the fit and texture appear consistent throughout your mockups. Finally, balance your designs with negative space to keep the focus on your product without overwhelming the viewer.
Quality Checks and Product Variations
Before wrapping up your mockups, take the time for a thorough quality check and create multiple versions to showcase your full product range. This step can elevate your visuals from basic to professional, making a real difference in driving sales.
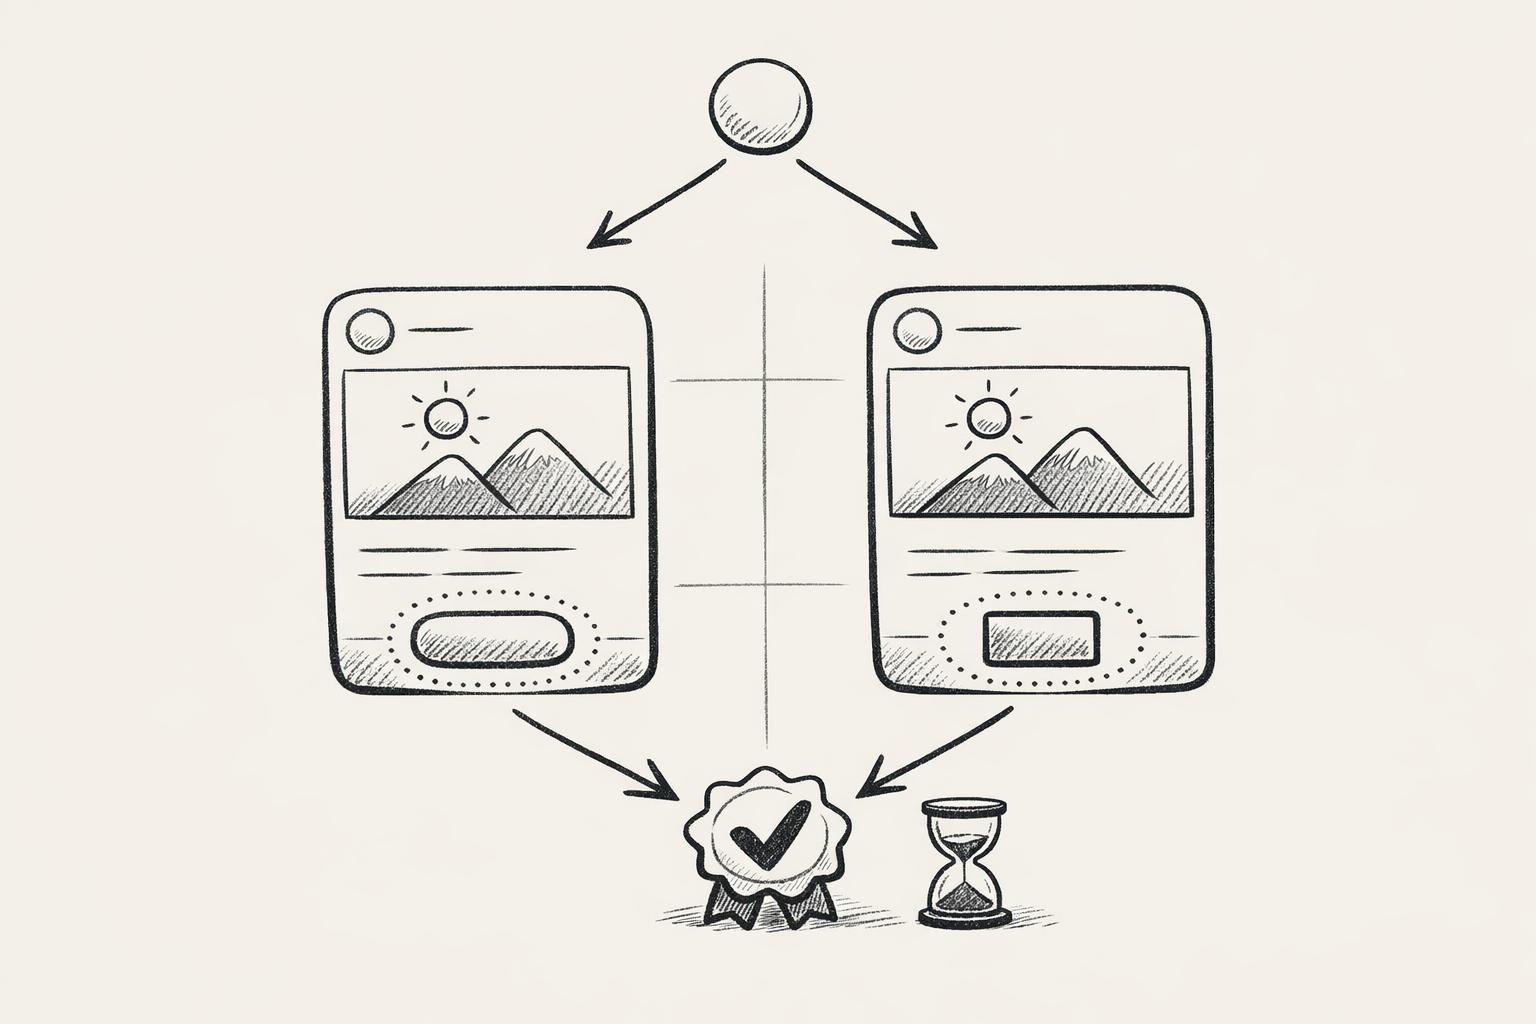
Check Resolution and Details
Zoom in on your mockup to ensure it meets professional-grade standards. Confirm that the resolution is sharp enough to maintain clarity when magnified, as previously defined. Pay close attention to photorealistic details such as textile grain, ribbing, seams, and other elements that should mimic a real garment. Features like wrinkles, folds, and textures should look natural and realistic. Double-check that your design is perfectly aligned and centered exactly where it will be printed. Poor-quality visuals can undermine even the best designs, so it’s crucial to review every detail carefully. Once the resolution and alignment are confirmed, move on to creating diverse mockup variations.
Create Multiple Versions
Offering a variety of mockups can make your presentation more appealing to a wider audience. Platforms like Mock It provide access to a massive library of over 5,000 templates from more than 45 leading apparel brands, allowing you to experiment with different colors, styles, and angles. Each template set includes six views (three front and three back) and lets you toggle between light and dark colors to test how your design looks in different settings. The editor’s color tile feature also allows for precise shade adjustments. For those with Pro accounts, tools like the AI Text-To-Image generator can create custom design elements, while the background remover enables you to place your garments in unique lifestyle scenarios.
Compare with Other Platforms
Once you’ve nailed the quality and variety of your mockups, it’s worth comparing what Mock It offers against other tools. Mock It stands out from competitors like Placeit, Kittl, and Canva by providing unlimited downloads and brand-accurate color libraries. While other platforms often charge per download or impose limits, Mock It has already helped users create over 521,221 mockups without restrictions. Pro users enjoy additional perks, including quarterly updates and the option to request one "Express" mockup with a one-week turnaround. At $19.99/month (or $14.99/month when billed annually), the Pro plan also includes advanced features like AI tools and a background remover – tools that aren’t available on many competing platforms.
Final Review and Optimization
Once you’ve completed your quality checks, it’s time to finalize your mockup for maximum impact. This step can be the game-changer that turns casual browsers into paying customers.
Confirm Mockup Accuracy
Before uploading your mockup, compare it closely to the original design. As 99designs advises, "A mockup can make a boring design look more interesting than it actually is. When you’re reviewing a mockup, make sure you look carefully at the flat design first to see if it really meets your expectations". This ensures you’re not misled by a polished mockup that might hide design flaws. If you’re working with print-on-demand services, it’s a good idea to order a physical sample. This allows you to check for things like fabric texture, color accuracy, and print placement, which can sometimes differ from the digital preview. Once you’ve verified these details, you can focus on optimizing your mockup to improve online sales.
Improve Online Sales Performance
A professional-quality mockup can make all the difference in converting visitors into buyers. High-resolution images – such as Mock It’s recommended 2,400 x 2,400 pixels – paired with multiple angles (front, back, and side views) allow potential customers to see every detail of your product. Adding realistic lighting and shadows can create depth, mimicking how the garment interacts with natural light, which builds buyer confidence. As Mockipedia cautions, "Using poorly made clothing mockups can result in misleading or unprofessional-looking images that can hurt your brand’s reputation". Taking the time to create accurate and appealing visuals ensures your product is presented in the best light.
Request Custom Mockups
If you’re selling premium brands like House of Blanks, Original Favorites, or Shaka Wear, it’s crucial to use mockups that accurately reflect those specific garments. Mock It‘s "Request A Mockup" feature allows you to request mockups for items not already in their library. Pro members enjoy priority for these requests and even get one Express Mockup Request per quarter, with a one-week turnaround once the physical item is available. This service eliminates the need for costly photoshoots while ensuring your mockups are a true representation of your inventory. By leveraging these tools, you can showcase your designs with precision and professionalism.
Conclusion
Creating top-notch mockups doesn’t have to be complicated. Start with a dependable platform, use high-resolution design files, and ensure your artwork is perfectly aligned. Pay attention to color accuracy, lighting, and backgrounds that complement your design. Finally, run thorough quality checks to ensure your mockups look polished and professional. This methodical approach lays the groundwork for selecting a tool that truly enhances your designs.
When it comes to mockup tools, Mock It stands out. It offers over 5,000 templates tailored to 45+ leading brands, including Bella + Canvas, Gildan, and Champion. Unlike generic options, Mock It provides brand-specific accuracy with complete color and fabric libraries, ensuring your mockups mirror the final product. Plus, it goes a step further with AI-powered features like background removal and text-to-image generation. With competitive pricing and a 7-day free trial, Mock It delivers everything you need to create professional-grade apparel mockups.
"A great mockup can make all the difference. It’s not just about displaying your products; it’s about capturing attention, sparking desire, and making a lasting impact on potential customers." – Abel B., Mock It
FAQs
What makes Mock It the best platform for creating apparel mockups?
Mock It has earned its reputation as a go-to platform for apparel mockups, boasting a library of over 5,000 premium templates. These templates cover a variety of clothing and accessory items, including t-shirts, hoodies, and hats, all neatly categorized by brand and garment type. This thoughtful organization ensures users can navigate effortlessly and achieve polished, professional results. Plus, every mockup is delivered in 300 DPI or higher with fully editable Photoshop layers, allowing for quick and easy adjustments to colors, logos, and design placements.
What sets Mock It apart are its advanced tools. The platform features a background remover, a scene creator for lifelike visuals, and an AI-driven text-to-image generator that speeds up the brainstorming process. Unlike many competitors that rely on static files and require additional software, Mock It combines all these features into a single, user-friendly interface. With perks like custom mockup requests, free templates, and budget-friendly subscription plans, Mock It is a smart and efficient solution for apparel designers across the U.S. looking to streamline their workflow.
How do I make sure the colors in my apparel mockups are accurate?
To make sure your apparel mockups display colors accurately, start with high-resolution templates (at least 300 dpi). These ensure that colors stay true even when scaling. Platforms like Mock It provide thousands of templates optimized for detailed editing. Always use your brand’s exact HEX, RGB, or CMYK color codes to avoid inconsistencies between digital and print formats. Input these codes directly into your editing software and fine-tune shadows and highlights to keep fabric textures looking realistic.
For accuracy, preview your mockups on various devices to spot any color shifts caused by different screens. Save your final designs in a lossless format like PNG or PSD for easy future edits, and keep a record of your color codes for quick access later. Mock It is a standout platform for creating professional apparel mockups, offering tools like a scene creator, background remover, and extensive color libraries to simplify the process.
Why are lighting and shadows important for creating realistic apparel mockups?
Lighting and shadows play a crucial role in making apparel mockups look authentic and polished. They bring depth, texture, and dimension to otherwise flat designs, helping garments appear more natural. Proper lighting accentuates the fabric’s shape and weight, while realistic shadows anchor the mockup, preventing it from looking flat or out of place.
With tools like Mock It, achieving this level of realism is a breeze. Its advanced scene creator and AI-powered lighting automatically fine-tune shadows and highlights to suit the garment and background. This not only saves time but also ensures a professional finish. Thoughtful use of lighting and shadows enhances visual appeal and helps shoppers visualize the product better, boosting confidence and the likelihood of a purchase.