
You can put images on T-shirts using either DIY methods or professional printing techniques, depending on your budget, design requirements, fabric type, and production volume. Popular DIY options include iron-on transfers, heat transfer vinyl (HTV), sublimation, and DIY screen printing, while professional methods include DTG, DTF, screen printing, and print-on-demand services. DIY methods are ideal for personal projects, gifts, prototypes, and small batches, whereas professional methods deliver higher print quality, greater durability, and better scalability for businesses and larger orders. DIY projects generally cost $5 to $12 per shirt in materials, while professional printing ranges from $10 to $30 per shirt for small runs and $5 to $15 per shirt for bulk orders.
To achieve the best results, use high-resolution 300 DPI artwork, select a printing method that matches your fabric, and prepare print-ready PNG, JPG, or vector files. Proper placement, sizing, and alignment help create balanced designs, whether you choose centered chest, left chest, sleeve, full back, back yoke, or oversized front graphics. After printing, follow proper care practices such as washing shirts inside out, using cold water, avoiding high heat, and storing garments correctly to preserve print quality and extend the life of the design.
Comparison Table of DIY Methods vs Professional Methods
DIY and professional methods both allow you to put images on T-shirts, but they differ in quality, cost, equipment requirements, and production capacity. DIY methods are best for personal projects, custom gifts, and small batches, while professional methods are designed for higher-quality results and larger production runs.
The table below compares the key differences to help you choose the most suitable option for your needs:
| Factor | DIY Methods | Professional Methods |
| Printing Quality | Good for simple and personal projects. | High-quality, consistent, and professional results. |
| Cost | $5–$12 per shirt in materials, plus $25–$350+ in equipment costs. | $10–$30 per shirt for small runs and $5–$15 per shirt for bulk orders. |
| Durability | Moderate, depending on materials and application. | More durable and wash-resistant. |
| Convenience | Can be done at home with basic tools. | Outsourced production with minimal effort. |
| Equipment Required | Iron, heat press, printer, vinyl cutter, or screen-printing supplies. | DTG, DTF, screen-printing, sublimation, or POD equipment. |
| Best For | Gifts, personal projects, prototypes, and small batches. | Brands, businesses, events, and large orders. |
| Printing Methods | Iron-On Transfers, HTV, Sublimation, DIY Screen Printing. | DTG, DTF, Screen Printing, Embroidery, Print-on-Demand. |
| Turnaround Time | Immediate once materials are available. | Usually a few days to weeks. |
| Fabric Compatibility | Varies by method and fabric type. | Compatible with a wider range of fabrics. |
| Scalability | Limited for large quantities. | Ideal for bulk production. |
| Wash Resistance | Good when applied correctly. | Excellent with proper production methods. |
| Beginner Friendliness | Easy to start, especially with HTV and transfers. | Requires professional equipment or services. |
DIY Methods for Putting Images on T-Shirts
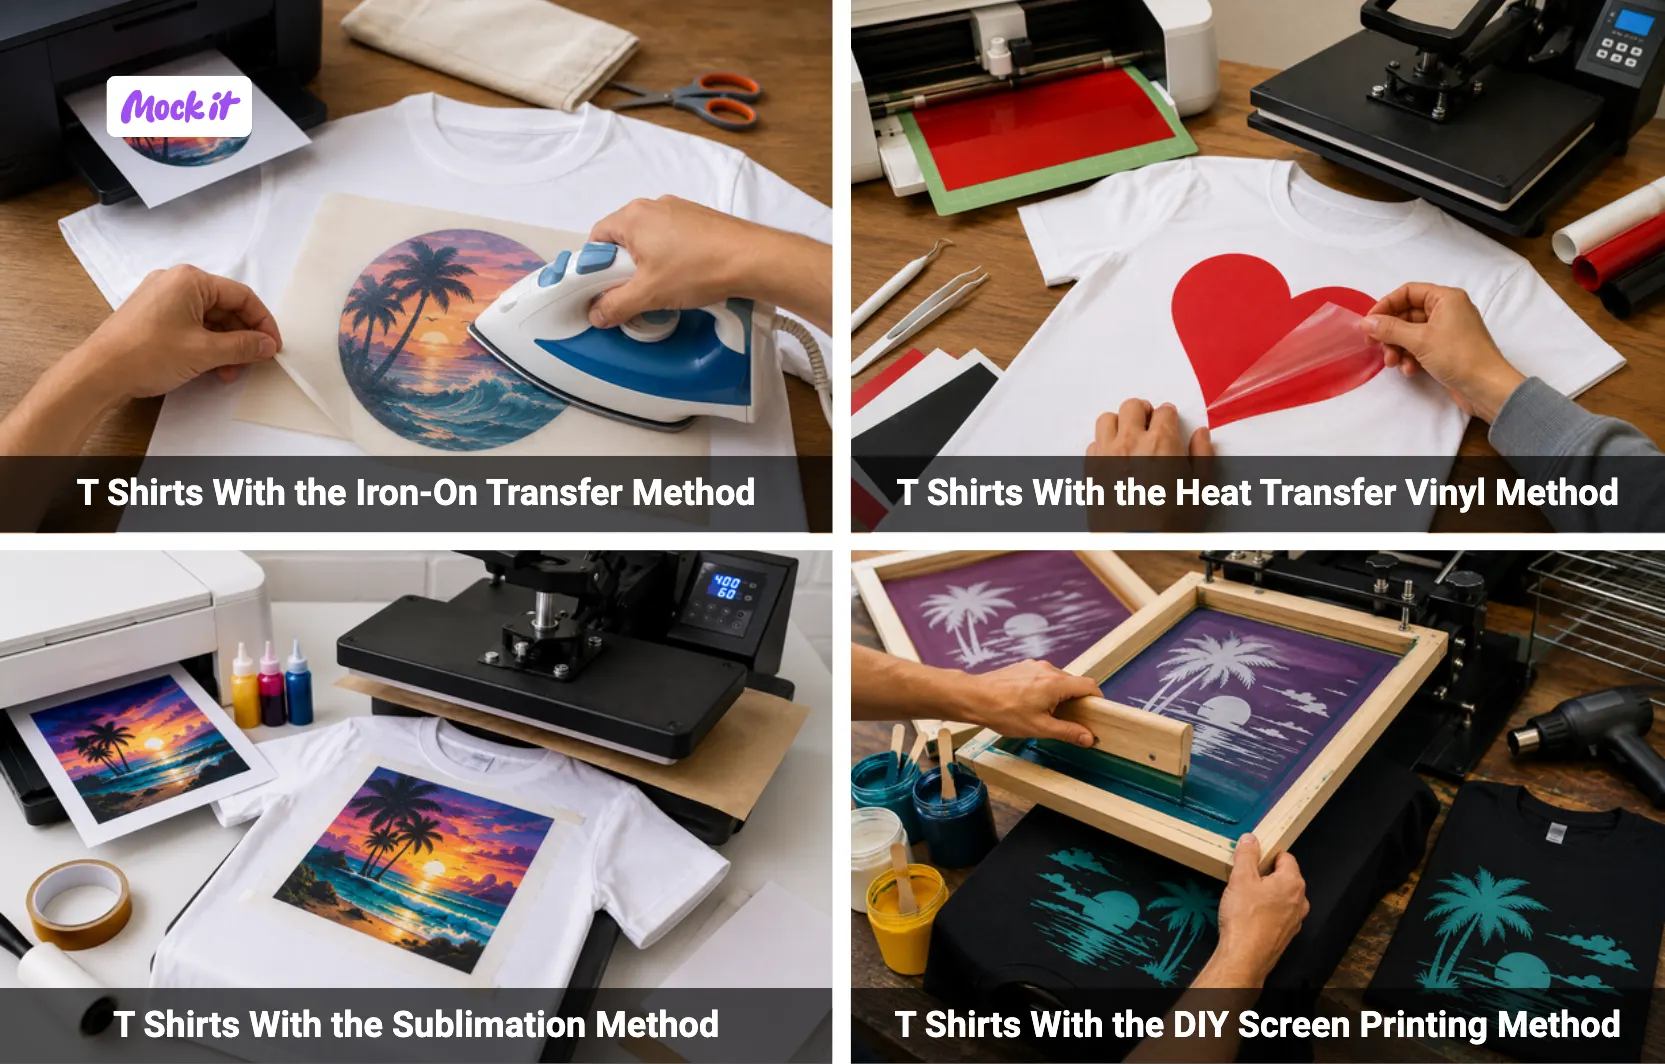
To put images on T-shirts at home, you can use the Iron-On Transfer Method, Heat Transfer Vinyl (HTV) Method, Sublimation Method, or DIY Screen Printing Method. These DIY methods allow you to create custom T-shirt designs without professional printing equipment and are suitable for personal projects, gifts, and small batches. Iron-on transfers are ideal for beginners, HTV works best for bold graphics and lettering, sublimation creates vibrant permanent prints on polyester fabrics, and DIY screen printing produces durable, colorful designs that can withstand repeated washing and regular wear.
How Do You Put Images on T-Shirts With the Iron-On Transfer Method?
To put images on T-shirts with the iron-on transfer method, print your design onto transfer paper, cut around the image, position the transfer on the shirt, apply heat with an iron, and peel away the backing after cooling. Iron-on transfer is a beginner-friendly DIY printing method that requires transfer paper, an inkjet printer, scissors, parchment paper, and a household iron. It works best on cotton and cotton-blend fabrics and is ideal for small runs, personalized gifts, and one-off custom designs.
- Print the Image on Transfer Paper
Prepare the design in editing software before printing. Mirror the image when using light transfer paper, especially if it includes text, but do not mirror it for dark transfer paper. Print on the correct side of the sheet using an inkjet printer and the highest quality setting. Check the paper instructions before printing. - Cut Around the Design
Trim the printed image carefully before applying it to the shirt. Leave about a 1/4-inch border around the design to prevent excess film from transferring. Use sharp scissors or a craft knife for clean edges. For detailed artwork, cut slowly or use a cutting machine to avoid damaging the image. - Place the Transfer Paper on the Shirt
Lay the shirt flat on a hard surface covered with a pillowcase or towel, then smooth out wrinkles. Place light transfer paper image-side down and dark transfer paper image-side up. Align the design straight and centered before applying heat. Double-check the placement because it cannot be easily corrected after pressing. - Apply Heat With an Iron
Set the iron to the highest cotton or linen setting and turn off steam completely. Press the iron firmly and evenly over the full design, including the corners and edges. Use dry heat and steady pressure so the image bonds properly to the fabric. Follow the transfer paper’s recommended pressing time. - Peel the Backing After Cooling
Let the shirt and transfer area cool to room temperature before peeling the backing paper. Peel slowly from one corner while checking that the image stays attached. If any part lifts, place the backing down again, reapply heat briefly, and allow it to cool before peeling again.
How Do You Put Images on T-Shirts With the Heat Transfer Vinyl Method?
To put images on T-shirts with the Heat Transfer Vinyl (HTV) method, cut the HTV design, weed the excess vinyl, position the design on the shirt, apply pressure with a heat press, and remove the carrier sheet. HTV is ideal for creating bold graphics, logos, and text with crisp edges and solid colors. It works on cotton, polyester, and blended fabrics and is best for custom apparel, lettering, and vector-style designs. Always mirror the design before cutting for accurate transfer.
- Cut the HTV Design
Prepare the image or graphic for the T-shirt in your cutting software and mirror the design before cutting. Place the heat transfer vinyl on the cutting mat with the carrier sheet facing down and select the correct material setting. Confirm the design is mirrored so the image appears correctly when transferred onto the T-shirt. - Weed the Excess Vinyl
Remove all unwanted vinyl from around the T-shirt design using a weeding tool or tweezers. Carefully peel away excess material, including small sections inside letters and shapes, while keeping the image attached to the carrier sheet. Clean weeding helps the final graphic appear sharp and professional on the finished T-shirt. - Position the Design on the Shirt
Preheat the T-shirt for 5–10 seconds to remove moisture and wrinkles before applying the design. Place the HTV graphic on the T-shirt with the carrier sheet facing up and align it in the desired print area. Check the placement carefully to ensure the image appears centered and straight before pressing. - Apply Pressure With a Heat Press
Transfer the HTV image onto the T-shirt by applying heat and pressure with a heat press or iron set to the manufacturer’s recommended temperature, around 305°F-315°F (132°C-157°C). Press evenly across the entire design for the specified time to ensure proper adhesion. Insufficient heat or pressure may cause the image to lift or peel after washing. - Remove the Carrier Sheet
Reveal the completed T-shirt design by peeling it off. Some HTV materials require a warm peel, while others require a cold peel. Peel slowly from one corner and check that the image remains attached to the T-shirt before fully removing the carrier sheet.
How Do You Put Images on T-Shirts With the Sublimation Method?
To put images on T-shirts with the sublimation method, print the design using sublimation ink, place the transfer paper face down on the shirt, apply high heat and pressure, then remove the paper while warm. Sublimation permanently bonds ink into polyester fibers, creating vibrant, long-lasting prints. This method requires a sublimation printer, ink, transfer paper, and a heat press. For best results, use light-colored polyester shirts, high-resolution 300 DPI images, and always mirror the design before printing.
- Print the Design With Sublimation Ink
Prepare the T-shirt design using a high-resolution image and save it as a PNG or high-quality JPEG file. Mirror the artwork before printing so it appears correctly after transfer. Print the design onto sublimation paper using sublimation ink and a sublimation printer, as standard inkjet inks will not produce a successful sublimation transfer. - Place the Transfer Paper Face Down on Polyester Fabric
Position the printed sublimation transfer face down on the polyester T-shirt, then carefully align it within the desired print area. Secure the transfer with heat-resistant tape to prevent movement during pressing. Use a lint roller to remove dust or debris from the T-shirt beforehand, as contaminants can affect print quality. - Apply High Heat and Pressure
Transfer the image onto the T-shirt using a heat press set to approximately 400°F. Apply firm, even pressure for 45–60 seconds or according to the transfer manufacturer’s instructions. Cover the design area with butcher paper to protect both the garment and the heat press. Incorrect temperature, pressure, or pressing time can result in faded or incomplete transfers. - Peel the Transfer While Still Warm
Remove the sublimation paper from the T-shirt immediately after pressing while the transfer is still warm. Peel the paper away smoothly and carefully to avoid disturbing the freshly transferred image. Allow the garment to cool naturally before handling further to prevent accidental marks or distortion. - Check for Full Ink Transfer
Inspect the completed T-shirt to confirm the image transferred evenly and completely. Look for vibrant colors, sharp details, and consistent coverage across the entire design. If sections appear faded or incomplete, review factors such as polyester content, image resolution, ink quality, and heat press settings, as each directly affects sublimation results and print durability.
How Do You Put Images on T-Shirts With the DIY Screen Printing Method?
To put images on T-shirts with the DIY screen printing method, create a screen stencil, position the screen over the shirt, apply ink, pull it through the mesh with a squeegee, and allow the print to cure. DIY screen printing uses a mesh stencil to transfer ink onto fabric, producing durable, vibrant designs. It requires a screen frame, photo emulsion, transparency film, exposure light, fabric ink, and a squeegee. Multi-color designs require separate screens for each color.
- Create the Screen Stencil
Prepare the T-shirt design on transparency film and place it against a screen coated with photo emulsion and sensitizer. After the emulsion dries, expose the screen to UV or exposure light so the emulsion hardens everywhere except where the design blocks the light. Rinse the screen with water to reveal the stencil that will transfer the image onto the T-shirt.
- Place the Screen Over the Shirt
Lay the T-shirt flat on a stable surface and smooth out any wrinkles before printing. Position the prepared screen over the T-shirt and align the stencil with the desired print area. Use alignment marks or guides if needed, and verify the placement from multiple angles to prevent off-center or uneven prints.
- Apply Ink Across the Screen
Add a line of fabric ink above the stencil area. Use the squeegee to spread the ink evenly across the mesh without applying heavy pressure. Ensure the ink covers the entire T-shirt design area before making the printing stroke, as uneven coverage can affect the final image quality. - Pull the Ink Through the Mesh With a Squeegee
Transfer the image onto the T-shirt by holding the squeegee at approximately a 45-degree angle and pulling it across the screen with firm, even pressure. Use one smooth stroke to push the ink through the open mesh areas and onto the fabric. Avoid inconsistent pressure, as it can create gaps, streaks, or uneven print coverage. - Let the Print Cure Properly
Set the printed image on the T-shirt by curing the ink with heat after printing. Use a heat press, heat gun, or household iron on a high setting without steam and apply heat evenly. Allow the T-shirt to cool completely before handling or washing, as proper curing improves durability and prevents the design from fading or washing out.
Professional Methods for Putting Images on T-Shirts
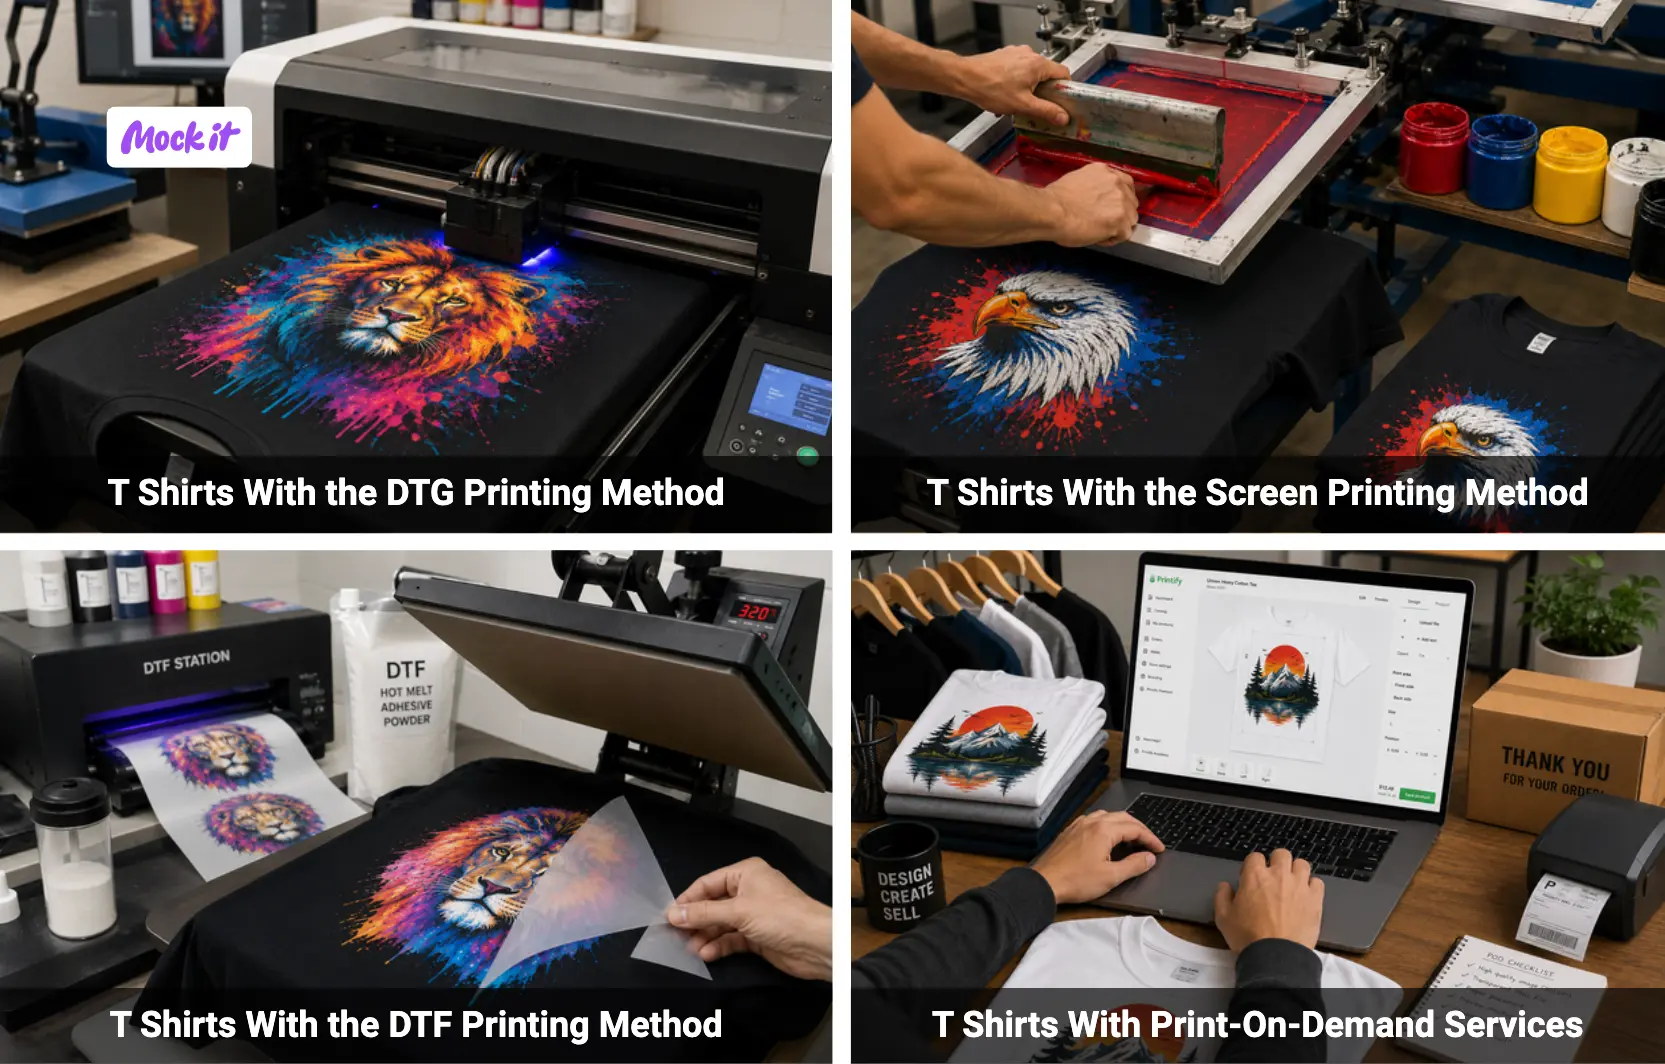
To put images on T-shirts professionally, you can use the DTG Printing Method, Screen Printing Method, DTF Printing Method, or Print-On-Demand Services. These methods offer higher print quality, greater durability, and better production efficiency than most DIY techniques. DTG is ideal for detailed full-color artwork, screen printing excels at bulk orders, DTF works on virtually any fabric and color, and print-on-demand services allow custom T-shirt production without owning printing equipment or maintaining inventory.
How Do You Put Images on T-Shirts With the DTG Printing Method?
To put images on T-shirts with the DTG (Direct-to-Garment) printing method, upload the image to the printer software, pretreat the garment, print directly onto the fabric, cure the ink with heat, and inspect the final result. DTG printing uses water-based inks to create detailed, full-color, and photographic-quality designs. It works best on 100% cotton T-shirts and requires a DTG printer, RIP software, pretreatment solution, and heat source. Use high-resolution 300 DPI images for optimal print quality.
- Upload the Image to the DTG Printer Software
Prepare the T-shirt design as a transparent PNG or high-quality JPEG file at 300 DPI and upload it into the DTG printer’s RIP software. Adjust the image size, placement, and orientation to match the desired print area on the T-shirt. Using the correct file format, resolution, and sRGB color mode helps ensure accurate colors and sharp details. - Pretreat the Garment Surface
Apply pretreatment solution evenly to the area of the T-shirt where the image will be printed. Use a heat press for 10–15 seconds to dry the solution and flatten the fabric fibers before printing. Proper pretreatment is especially important for cotton T-shirts because it improves ink adhesion, color vibrancy, and print durability.
Pretreat the Garment Surface
Apply pretreatment solution evenly to the area of the T-shirt where the image will be printed. Use a heat press for 10–15 seconds to dry the solution and flatten the fabric fibers before printing. Proper pretreatment is especially important for cotton T-shirts because it improves ink adhesion, color vibrancy, and print durability. - Print the Design Directly Onto the Fabric
Load the pretreated T-shirt onto the printer platen and ensure it is smooth and correctly aligned. The DTG printer will spray water-based inks directly onto the fabric to create the image. For dark-colored T-shirts, a white ink underbase is typically printed first, so the final colors appear bright, accurate, and well-defined. - Cure the Ink With Heat
Permanently set the printed image on the T-shirt by curing the ink with a heat press or conveyor dryer. Apply heat according to the equipment and ink manufacturer’s guidelines, between 320°F and 380°F for 10–30 seconds. Place parchment paper or a Teflon sheet over the design during curing to protect the print surface. - Inspect the Print Quality
Examine the finished T-shirt to verify color accuracy, image sharpness, and ink adhesion. Check for blurry details, pixelation, smudges, or uneven printing across the design. Gently inspect the print surface to ensure the ink is fully cured and securely bonded to the fabric. Proper inspection helps identify issues before the T-shirt is worn, washed, or delivered to a customer.
How Do You Put Images on T-Shirts With the Screen Printing Method?
To print images on T-shirts using screen printing, prepare a separate screen for each color, align the shirt on the platen, apply ink through each screen, flash-cure between colors, and fully cure the finished print. Screen printing transfers ink through mesh stencils onto fabric and is a cost-effective method for bulk orders and durable designs. It works on various fabrics and is ideal for large quantities, bold graphics, and long-lasting prints. Each color requires a separate screen and proper registration for accurate results.
- Prepare a Separated Screen for Each Color
Separate each color in the T-shirt design into its own layer and create a dedicated screen for every color. Print each color separation onto transparency film with registration marks to ensure accurate alignment. Use high-resolution artwork of at least 300 DPI and create a white underbase when printing on dark-colored T-shirts to improve color vibrancy. - Align the Shirt on the Platen
Place the T-shirt flat on the platen and center it carefully before printing. Position the collar evenly and align the design according to the desired print location. Use center creases, guides, or registration marks to maintain consistent placement across multiple T-shirts and prevent off-center prints. - Apply Ink Through Each Screen
Load fabric ink onto the screen and spread it across the mesh above the stencil area. Pull the squeegee firmly and evenly across the screen to transfer the ink onto the T-shirt. Repeat the process for each color layer, using the corresponding screen and maintaining consistent pressure for uniform print quality. - Flash Cure Between Colors
Partially dry each printed ink layer before applying the next color. Use a flash dryer or heat source set between 260°F and 300°F for approximately 5–15 seconds to gel the ink surface. Proper flash curing prevents color smudging, improves registration accuracy, and helps subsequent layers adhere correctly. - Fully Cure the Finished Print
Permanently set the completed T-shirt design by curing the entire print with a conveyor dryer or heat press. Apply heat between 320°F and 355°F for 15–40 seconds. Proper curing bonds the ink to the fabric, improving wash resistance and preventing premature fading, peeling, or cracking.
How Do You Put Images on T-Shirts With the DTF Printing Method?
To put images on T-shirts with the DTF (Direct-to-Film) printing method, print the design onto transfer film, apply adhesive powder, cure the powder, heat press the transfer onto the T-shirt, and peel away the film. DTF printing transfers designs from a printed film onto fabric using heat and adhesive powder. Unlike DTG printing, it works on any fabric type and color without pretreatment. This method requires a DTF printer, transfer film, adhesive powder, and a heat press.
- Print the Design Onto Transfer Film
Prepare and print the image to be transferred onto the T-shirt using a DTF printer and transfer film. Save the artwork as a high-resolution PNG with a transparent background, and size it to fit the intended print area. Using high-quality artwork and correct printer settings helps produce sharp details and vibrant colors on the finished T-shirt. - Apply Adhesive Powder
Coat the freshly printed DTF T-shirt design on the transfer film with adhesive powder while the ink is still wet. Shake and spread the powder evenly so it covers the entire printed image. Remove excess powder from the film, as uneven coverage can affect adhesion and create imperfections on the finished T-shirt design. - Cure the Adhesive Powder on the Film
Activate the adhesive that will transfer the image onto the T-shirt by curing the powdered DTF film with heat. Follow the manufacturer’s recommended temperature and curing time to melt the adhesive evenly. Avoid overheating the film because excessive heat can reduce transfer quality and adhesion. - Heat Press the Transfer Onto the Shirt
Transfer the image onto the T-shirt by positioning the cured DTF film in the desired print area and pressing it with a heat press. Apply the recommended temperature, pressure, and pressing time to ensure the design adheres evenly. Proper heat application helps create a durable and long-lasting T-shirt print. - Peel the Film After Pressing
Reveal the completed image on the T-shirt by removing the transfer film after pressing. Follow the recommended hot-peel, warm-peel, or cold-peel instructions for the specific transfer material. Peel slowly and evenly to ensure the entire image remains attached to the T-shirt without lifting or distortion.
How Do You Put Images on T-Shirts With Print-On-Demand Services?
To put images on T-shirts with print-on-demand services, upload the T-shirt design artwork, position it on a shirt template, preview the mockup, select a printing method, and place the order. Print-on-demand (POD) is a service where custom T-shirts are printed and shipped only after a customer purchases them. It requires no inventory or printing equipment, making it ideal for creators and small businesses.
- Upload the Artwork
Start the T-shirt printing process by uploading the image that will appear on the finished garment to the print-on-demand platform. Use a high-resolution PNG file with a transparent background and verify that it meets the platform’s size requirements. High-quality artwork helps ensure sharp details and accurate colors on the printed T-shirt. - Position the Design on a Shirt Template
Adjust where the image will appear on the T-shirt by placing it within the platform’s digital shirt template. Resize, align, and center the artwork according to the desired print location. Proper positioning helps create a balanced and professional-looking T-shirt design. - Preview the Mockup Before Printing
Review a digital representation of the T-shirt before production begins. Check whether the image appears at the correct size, in the correct position, and with appropriate color contrast on the selected garment style. Examining the mockup helps identify design issues before the T-shirt is printed. - Select the Printing Method
Choose how the image will be applied to the T-shirt from the available options. Most print-on-demand providers offer methods such as DTG printing, DTF printing, embroidery, or all-over printing. Selecting the right method affects print quality, durability, and compatibility with the garment. - Place the Order For Printing
Submit the finalized T-shirt design for production after confirming the artwork, garment specifications, and shipping details. Once the order is processed, the provider prints the image onto the T-shirt, packages the product, and ships it directly to the customer.
What Tips Should You Follow Before Putting Images on T-Shirts?
Before putting images on T-shirts, use high-resolution images, choose a compatible shirt fabric, prepare print-ready files, resize graphics correctly, remove unnecessary backgrounds, align designs carefully, select the proper color mode, preview artwork on mockups, apply even heat and pressure, avoid overcrowding the design area, and allow prints to cure before washing. Following these preparation steps helps improve print quality, color accuracy, durability, and overall appearance while reducing common printing mistakes.
- Use High-Resolution Images
Use high-resolution images when putting images on T-shirts to ensure the final print appears sharp and detailed. Prepare artwork at a minimum of 300 DPI (dots per inch), as low-resolution files can become blurry or pixelated when transferred onto a T-shirt, especially for large or detailed designs. - Choose a Compatible Shirt Fabric
Choose a shirt fabric that matches the method used for putting images on T-shirts. Cotton works best for DTG printing, screen printing, and iron-on transfers, while polyester is required for sublimation. Using a compatible fabric helps the image adhere properly to the T-shirt and improves print longevity. - Use Print-Ready PNG, JPG, or Vector Files
Prepare print-ready files before putting images on T-shirts to avoid quality issues during production. PNG files with transparent backgrounds are ideal for most T-shirt graphics, while JPG and vector formats may be suitable depending on the design and printing method. - Resize Graphics for the Correct Print Zones
Resize T-shirt design graphics to fit the intended print area on the garment. Proper sizing helps the artwork appear balanced and visually appealing. Incorrectly sized T-shirt graphics can look disproportionate and reduce the overall design impact. - Remove Image Backgrounds When Needed
Remove unwanted backgrounds before putting images on T-shirts if the design requires transparency or will be printed on colored garments. Exporting the artwork as a transparent PNG helps the image blend naturally with the T-shirt fabric. - Align Designs Before Printing
Align the artwork carefully before putting images on T-shirts to ensure the design appears straight and centered. Using placement guides, templates, or alignment tools helps create a professional-looking T-shirt print. - Choose the Correct Color Mode
Use the color mode recommended for your T-shirt printing workflow,such as RGB or CMYK, depending on the printing process. Correct color settings help maintain accurate color reproduction. Using the wrong color mode can cause noticeable color shifts in the final T-shirt print. - Preview Artwork on Mockups
Preview the design on a T-shirt mockup before putting images on T-shirts to evaluate placement, scale, and color contrast. Mockups help identify design issues before production and reduce the risk of costly printing mistakes. - Apply Even Heat and Pressure
Apply even heat and pressure when putting images on T-shirts using transfer-based methods. Consistent heat distribution helps the image adhere evenly to the garment and reduces the risk of peeling, fading, or incomplete transfers. - Avoid Overcrowding the Design Area
Leave sufficient negative space around design elements when putting images on T-shirts to improve readability and visual balance. Negative space helps the image stand out and prevents the finished T-shirt from appearing cluttered. - Let Prints Cure Properly Before Washing
Allow the printed T-shirt to cure fully according to the printing method and material requirements. Most prints should cure for at least 24–48 hours before washing to improve durability and reduce the risk of fading, cracking, or peeling.
Where Can You Place Images on T-Shirts?
You can place images on T-shirts in several locations, including the centered chest, left chest, oversized front, full back, sleeves, and back yoke. The best placement depends on the design size, purpose, and shirt style. Proper positioning, spacing below the collar, and correct print dimensions help create a balanced, professional appearance. When preparing artwork, always consider whether the T-shirt is for adults, youth sizes, or V-neck styles, as placement measurements vary accordingly.
- Centered Chest Placement
Place the image in the center of the T-shirt, approximately 3–4 inches below the collar and aligned with the shirt’s vertical center line. This is one of the most popular placements for logos, slogans, and medium-sized graphics because it provides high visibility and a balanced appearance. Standard-centered chest designs are typically 8–10 inches wide. - Left Chest Logos
Position small logos on the upper left chest of the T-shirt, typically 3–4 inches below the collar and 3–4 inches wide. This placement is commonly used for company branding, uniforms, monograms, and subtle designs. Proper alignment beneath the left shoulder seam helps maintain a professional appearance. - Oversized Front Graphics
Apply large images across most of the front of the T-shirt for maximum visual impact. Oversized front graphics generally measure 13–15 inches wide and extend from the upper chest toward the midsection. Maintaining adequate spacing from the side seams helps keep the design visually balanced. - Full-Back Graphics
Print large artwork on the back of the T-shirt for event designs, team apparel, promotional graphics, or statement artwork. Full-back prints are typically 10–14 inches wide and positioned 3–6 inches below the back collar to achieve balanced coverage across the back panel. - Sleeve Graphics
Add small images, logos, icons, or text to the sleeves of a T-shirt for secondary branding or decorative details. Sleeve graphics are usually 3–4 inches wide and centered near the shoulder seam to maintain consistency across multiple garments. - Back Yoke Placement
Position small graphics or logos on the upper back of the T-shirt between the shoulder blades. Back yoke designs are generally 2–3 inches wide and placed 1–2 inches below the collar seam. This location is often used for discreet branding and secondary logos. - Spacing Below the Collar
Leave appropriate spacing between the collar and the image to prevent the design from appearing too high on the T-shirt. Adult shirts typically require 3–3.5 inches of spacing below the collar, while youth and women’s shirts generally use 2–2.5 inches. Proper spacing improves visual balance and readability. - Standard Print Dimensions
Size the image according to the chosen T-shirt print area. Full chest prints generally measure 10–12 inches wide, center chest designs range from 9–13 inches wide, left chest graphics are 3.5–4.5 inches wide, full-back prints are approximately 12–14 inches wide by 14–17 inches tall, and sleeve graphics are usually 3–4 inches wide. Use high-resolution 300 DPI artwork for all print locations. - Placement Differences for Youth and Adult Shirts
Adjust image placement and size based on the T-shirt dimensions. Adult shirts typically require artwork positioned 3–4 inches below the collar with design widths of 10–12 inches, while youth shirts generally use a 2–3 inch drop and design widths of 9–10.5 inches. Scaling the artwork appropriately helps maintain proportion and readability. - V-Neck Placement Adjustments
Modify image placement when printing on V-neck T-shirts to accommodate the lower neckline. Full-front graphics should begin approximately 1–1.5 inches below the V-neck point, while left chest logos are typically positioned 6–8 inches below the shoulder seam and 3–4 inches from the center line. These adjustments help keep the design visually centered on the garment.
What Tips Help You Make T Shirt Prints Last Longer?
To make T-shirt prints last longer, wash shirts inside out, use cold water cycles, choose mild detergents, avoid bleach and fabric softeners, skip high-heat drying, avoid ironing directly on prints, prevent overstretching the fabric, and store printed shirts correctly. These care practices help protect printed images from cracking, fading, peeling, and distortion while preserving both the fabric and the design over time.
- Wash Shirts Inside Out
Wash printed T-shirts inside out to protect the image from friction during laundering. Turning the garment inside out reduces direct contact between the print, other clothing, and the washing machine drum, helping prevent fading, cracking, and surface wear. - Use Cold Water Cycles
Clean printed T-shirts using cold water cycles, ideally at 30°C (86°F) or below. Cold water helps preserve both the fabric and the printed image by reducing heat stress on inks, transfer materials, and adhesives that can weaken over time. - Use Mild Detergents
Choose mild detergents when washing T-shirts with printed images. Gentle cleaning agents help maintain color vibrancy and reduce the risk of damaging the print, making them a safer option than harsh chemical-based detergents. - Avoid Bleach and Fabric Softeners
Keep bleach and fabric softeners away from printed T-shirts because they can break down inks, adhesives, and transfer materials. These chemicals may cause printed images to fade, crack, peel, or lose their original appearance over time. - Avoid High-Heat Drying
Protect printed T-shirts from premature wear by avoiding high-heat drying. Excessive dryer temperatures can damage the printed image by causing cracking, peeling, shrinking, or color fading. Air drying or using a low-heat setting is a safer alternative. - Avoid Ironing Directly on Prints
Prevent damage to printed images by never ironing directly on the design. Turn the T-shirt inside out before ironing, or place a thin cloth or parchment paper over the print to shield it from direct heat and pressure. - Prevent Over-Stretching the Fabric
Handle printed T-shirts carefully to avoid overstretching the fabric around the design. Excessive pulling when putting on, removing, or wearing the shirt can cause the printed image to crack, distort, or lose its shape. - Store Printed Shirts Correctly
Store printed T-shirts in a cool, dry place away from direct sunlight to protect the image from fading and deterioration. Folding shirts instead of hanging them, storing them inside out, and placing tissue paper between stacked garments can further reduce friction and help maintain print quality.